use your sub-domain to access your home server (eg Home Assistant) using a CNAME – plus nginx proxy manager
your need for a (nicer) sub-domain:
At home you access an IP camera, a router, Home Assistant, a wi-fi access point, a NAS drive (eg Synology or QNAP) or perhaps a self-hosted wordpress blog. For example, my ‘home server’ is an old PC that runs plex media server; the frigate IP camera app; a spare copy of Home Assistant and Uptime Kuma to alert me of something failing.
When you are away from home you will want a URL to access some of those services. The URL might be mystuff23.duckdns.org but if you own a domain (mydomain.com) you can create subdomains to access those services. You’ll then have camera.mydomain.com or wordpress.mydomain.com and nas.mydomain.com and frigate.mydomain.com – without limits.
what you need to point your sub-domain to your home network
- you need a domain with a hosting provider that lets you add subdomains and lets you adjust their CNAME records. I use 1&1 IONOS hosting and I’ve always been able to do that.
- you also need a dynamic DNS URL. You can get this from a device at home which talks to and updates a dynamic DNS service. For example,
- you can use the dynamic DNS service built into routers to connect to a web service such as noip or dyndns. E.g. get yourself an account at one of them and enter the login details at your router.
- or you can use the duckdns add-on in Home Assistant. I do this to get ‘mysubdomain.duckdns.org’.
- or your router may give you a URL for remote access – eg with my tplink router I might set CNAME to ‘myloginID.tplinkcloud.com’.
- or if you have a Synology or QNAP NAS both of these may give you a URL to allow remote access. Worry not – you do not need to allow remote access to your NAS:you’re simply going to borrow the URL. You set the subdomain CNAME to myqnapID.qnapcloud.com or the Synology equivalent. (Any alternative device redirect which looks like qnap.to/myqnap didn’t work for me).
- smart home devices invisibly report my home IP back to a cloud service so in theory if I could get inside any one of these I’d have another way to get to my home IP address.
- optional but highly recommended is to have a server (eg Home Assistant or QNAP or Synology) running nginx proxy manager as a switchboard (see my set up to use nginx).
doesn’t cloudflared do this?
Much as I would like to use CLOUDFLARE + cloudflared Home Assistant add-on, Cloudflare insists that I use my root domain. It is a big ask for me to switch my email nameservers and websites over to Cloudflare nameservers – I’m reluctant to mess up these lifelines. Cloudflare doesn’t let me use just a sub-domain on the free plan. So this idea to use Cloudflared must wait till I get a spare domain for play.

ways to reduce risk – it isn’t wise to expose all of your home network to the Internet:
- you turned off UPnP on your router. (I did that, and months later my smart devices are all fine).
- your home network is internally secured to prevent the neighbours getting in – for example, your camera and router require a password to access them.
- the services you’ll expose to the Internet will be accessed via nginx proxy manager which will obfuscate the ports and IP addresses of those services. This is much better than opening a range of ports such as opening port 8123 to give access to a Home Assistant setup.
- you haven’t exposed the wrong services or personal data. Indeed you’d be wise to be selective about exposing your QNAP NAS or your PC for remote access
- each camera, or device or service will have a login with an obscure username and password. By using nginx you can add another authentication step before a user gets to enter that password.
- you’ll be using https:// for the connection so that data and passwords crossing this connection can’t be sniffed. We’ll do this via a self-signed SSL certificate and Letsencrypt.
- you’re aware that a VPN or a ‘wireguard’ setup might offer an alternative method of security. I’m not covering this here but you can see my setup to use ‘wireguard’.
how to point your sub-domain to your home IP via a dynamic DNS service URL
Using ‘what you need’ above you have now a dynamic DNS service URL – a URL such as myhome.noiphop.to or myhome.duckdns.org or myhome.tplinkcloud.com. Or you might have the URL from myqnapcloud or synologycloud or a Raspberry Pi running Home Assistant (see what I did there).
Login to your hosting provider. Create a sub-domain eg wordpress.mydomain.com. Now look for the option to change the destination of that sub-domain (or ‘adjust DNS’). I use IONOS and here the process involves
- create a sub-domain.
- add a DNS record. Add CNAME.
- for the CNAME enter the dynamic DNS URL eg myhome.duckdns.org. The TTL (time to live) can be left at the time suggested. You don’t need any of the other DNS entries for the sub domain. You don’t need A, AAAA or MX records.
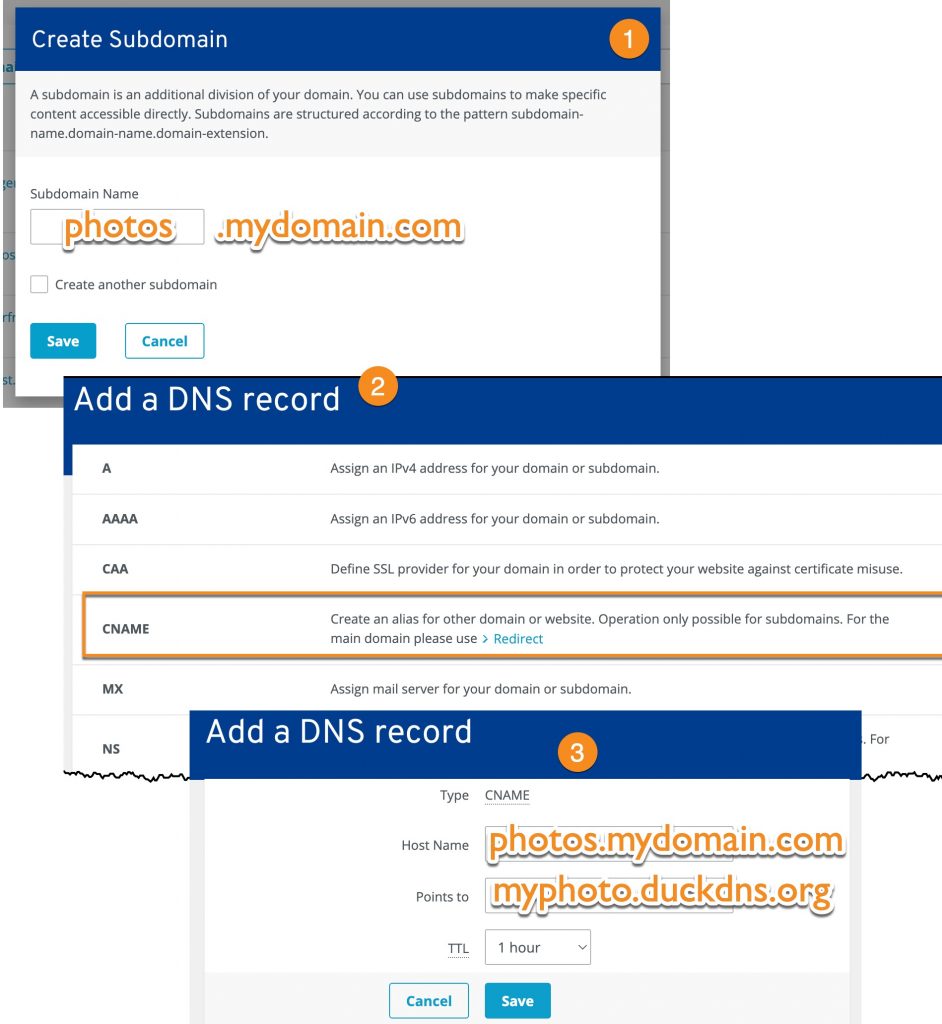
Create more subdomains as required – for example homeassistant.mydomain.com and camera.mydomain.com. For each of these you’ll add a CNAME with the same dynamic DNS URL as before eg mydns.duckdns.org / myphoto.duckdns.org / myhome.tplinkcloud.com. No one will see this – they’ll only see your subdomain. CNAME stands for ‘canonical name’ meaning that you’ve substituted the usual URL for a better ‘more authoritative’ URL.
Within some minutes entering the URL eg wordpress.mydomain.com should take you back to your router. In fact it will take you to wherever port 80 or port 443 goes on your home router – quite possibly the router blocks these ports. When you have nginx proxy manager you’ll have opened ports 80 and 443 and pointed them to nginx. If all’s well the URL will go to the nginx default page.
use nginx proxy manager to re-route each sub-domain
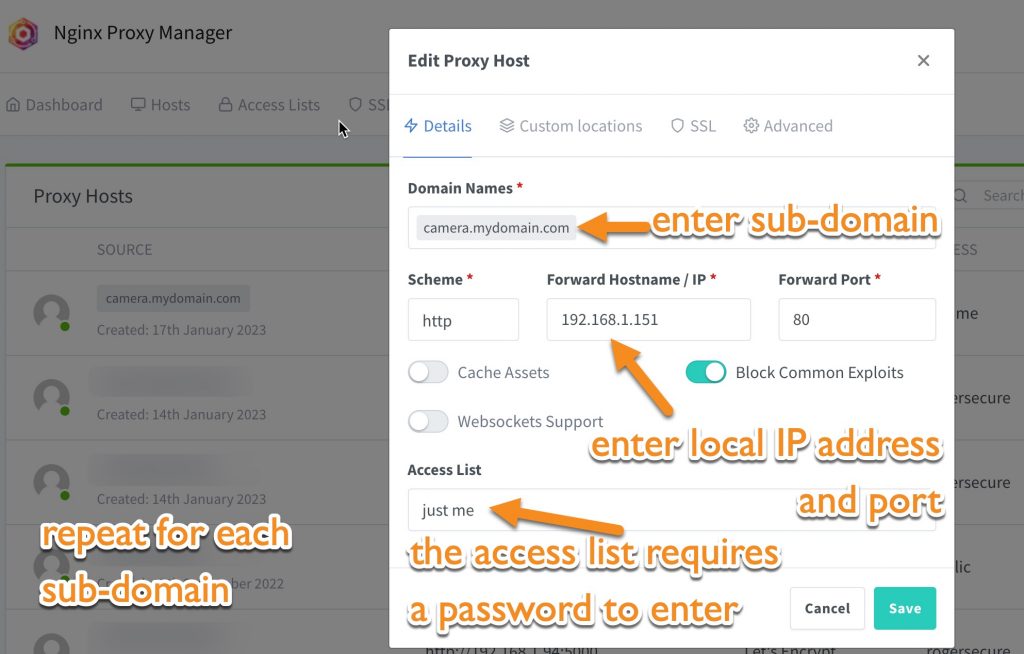
At this stage you’ve set up a sub-domain for each service that you need remote access to. Now you’ll use nginx proxy manager as a switchboard to direct those sub-domains to the service (eg camera, NAS) you want to from outside the home network.The process is
- enter the subdomain which has a CNAME pointing to the dynamic DNS URL
- enter the IP address where your service resides. Add a port if needed
- check block common exploits
- in access list create a username and password to block entry (allow = all deny = all for this access list user)
- click SSL and ‘request a new certificate’ for this subdomain. Enter your email address and click ‘save’. It may take a minute to get this.
- repeat for every subdomain