use a smart switch to turn off a lithium battery charger
I know that I ought not leave things powered on. Knowing that is easier than remembering that an e-bike or drone or laptop battery is still connected. Below I show some ways to turn on the power and forget about it. The project, which I’ll use for precious gear, cost ~£15 and takes an hour if you already use Home Assistant. Or you can use a timer and it’ll take minutes.
Modern charger & battery systems reduce (but not cut) the charging and massively help against overcharging. Rest assured that good equipment has overcautious protection built-in. Yet I have witnessed laptop batteries get overcharged and become useless, so it seems wise to see what the manual says about always on power.
In the big picture seen by fire services, chargers and batteries cause fires. Bad stuff can happen if you charge a battery pack that gets hot, has been dropped, crushed, or soaked with water. An internal short can lead to a fire. Yet you don’t hear people admit that they’re careless with their battery – they blame the equipment. Personally I blame the people who write tedious safety advice – it is so tedious, it’s not respected. I read it and I treat lithium cells with respect.
Incidentally, I’ve been told that lithium batteries are most happy, or live longer when they exist within a range of charge. If a battery has 40% – 80% charge I leave it at that and later top it up, as necessary, before use or if the level drops below ~40%. Such targets are tricky to aim-for in real life – and there’s too much to read about this.
three ways to automatically cut the power to a charger
plug your charger into a old-style timer socket. Turn the timer ‘on’ to start charging but set it to always turn off at a certain time of night. examples: Timeguard plug-in timers or a heating boost switch that delivers x hours of ‘on’ time.
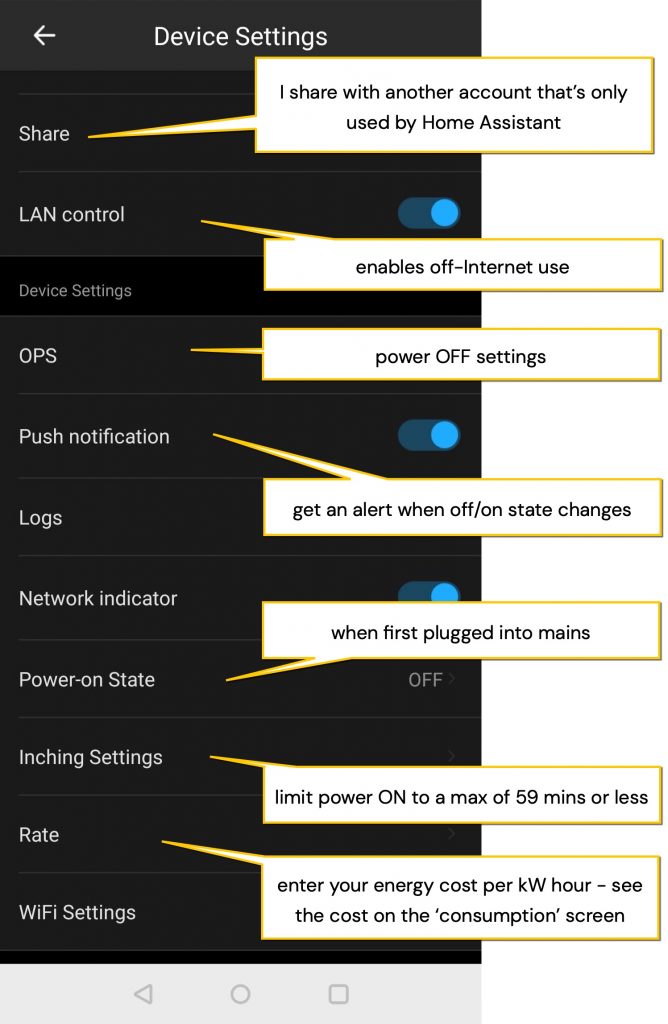
use your charger with a smart switch that has energy monitoring. Turn on the switch to start charging but get it to turn it off when the charging current is low. examples: Tuya or TPlink or Smarthings or Sonoff POW2 relay. Link this to Home Assistant for much a better experience.
plug your charger into a smart socket. Use the smart socket app to create a ‘timer’ that turns off after a certain number of hours. example: Sonoff basic relay and eWelink app
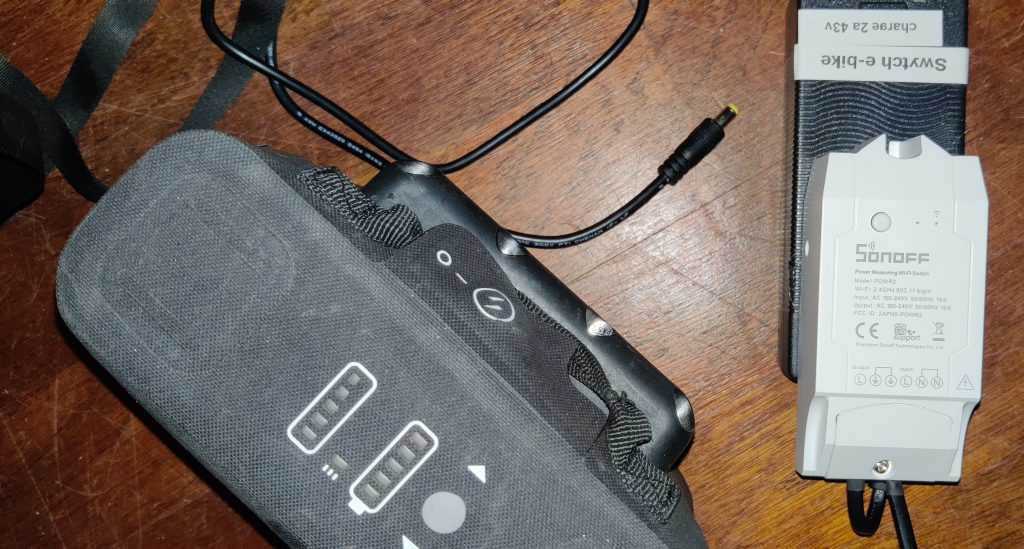
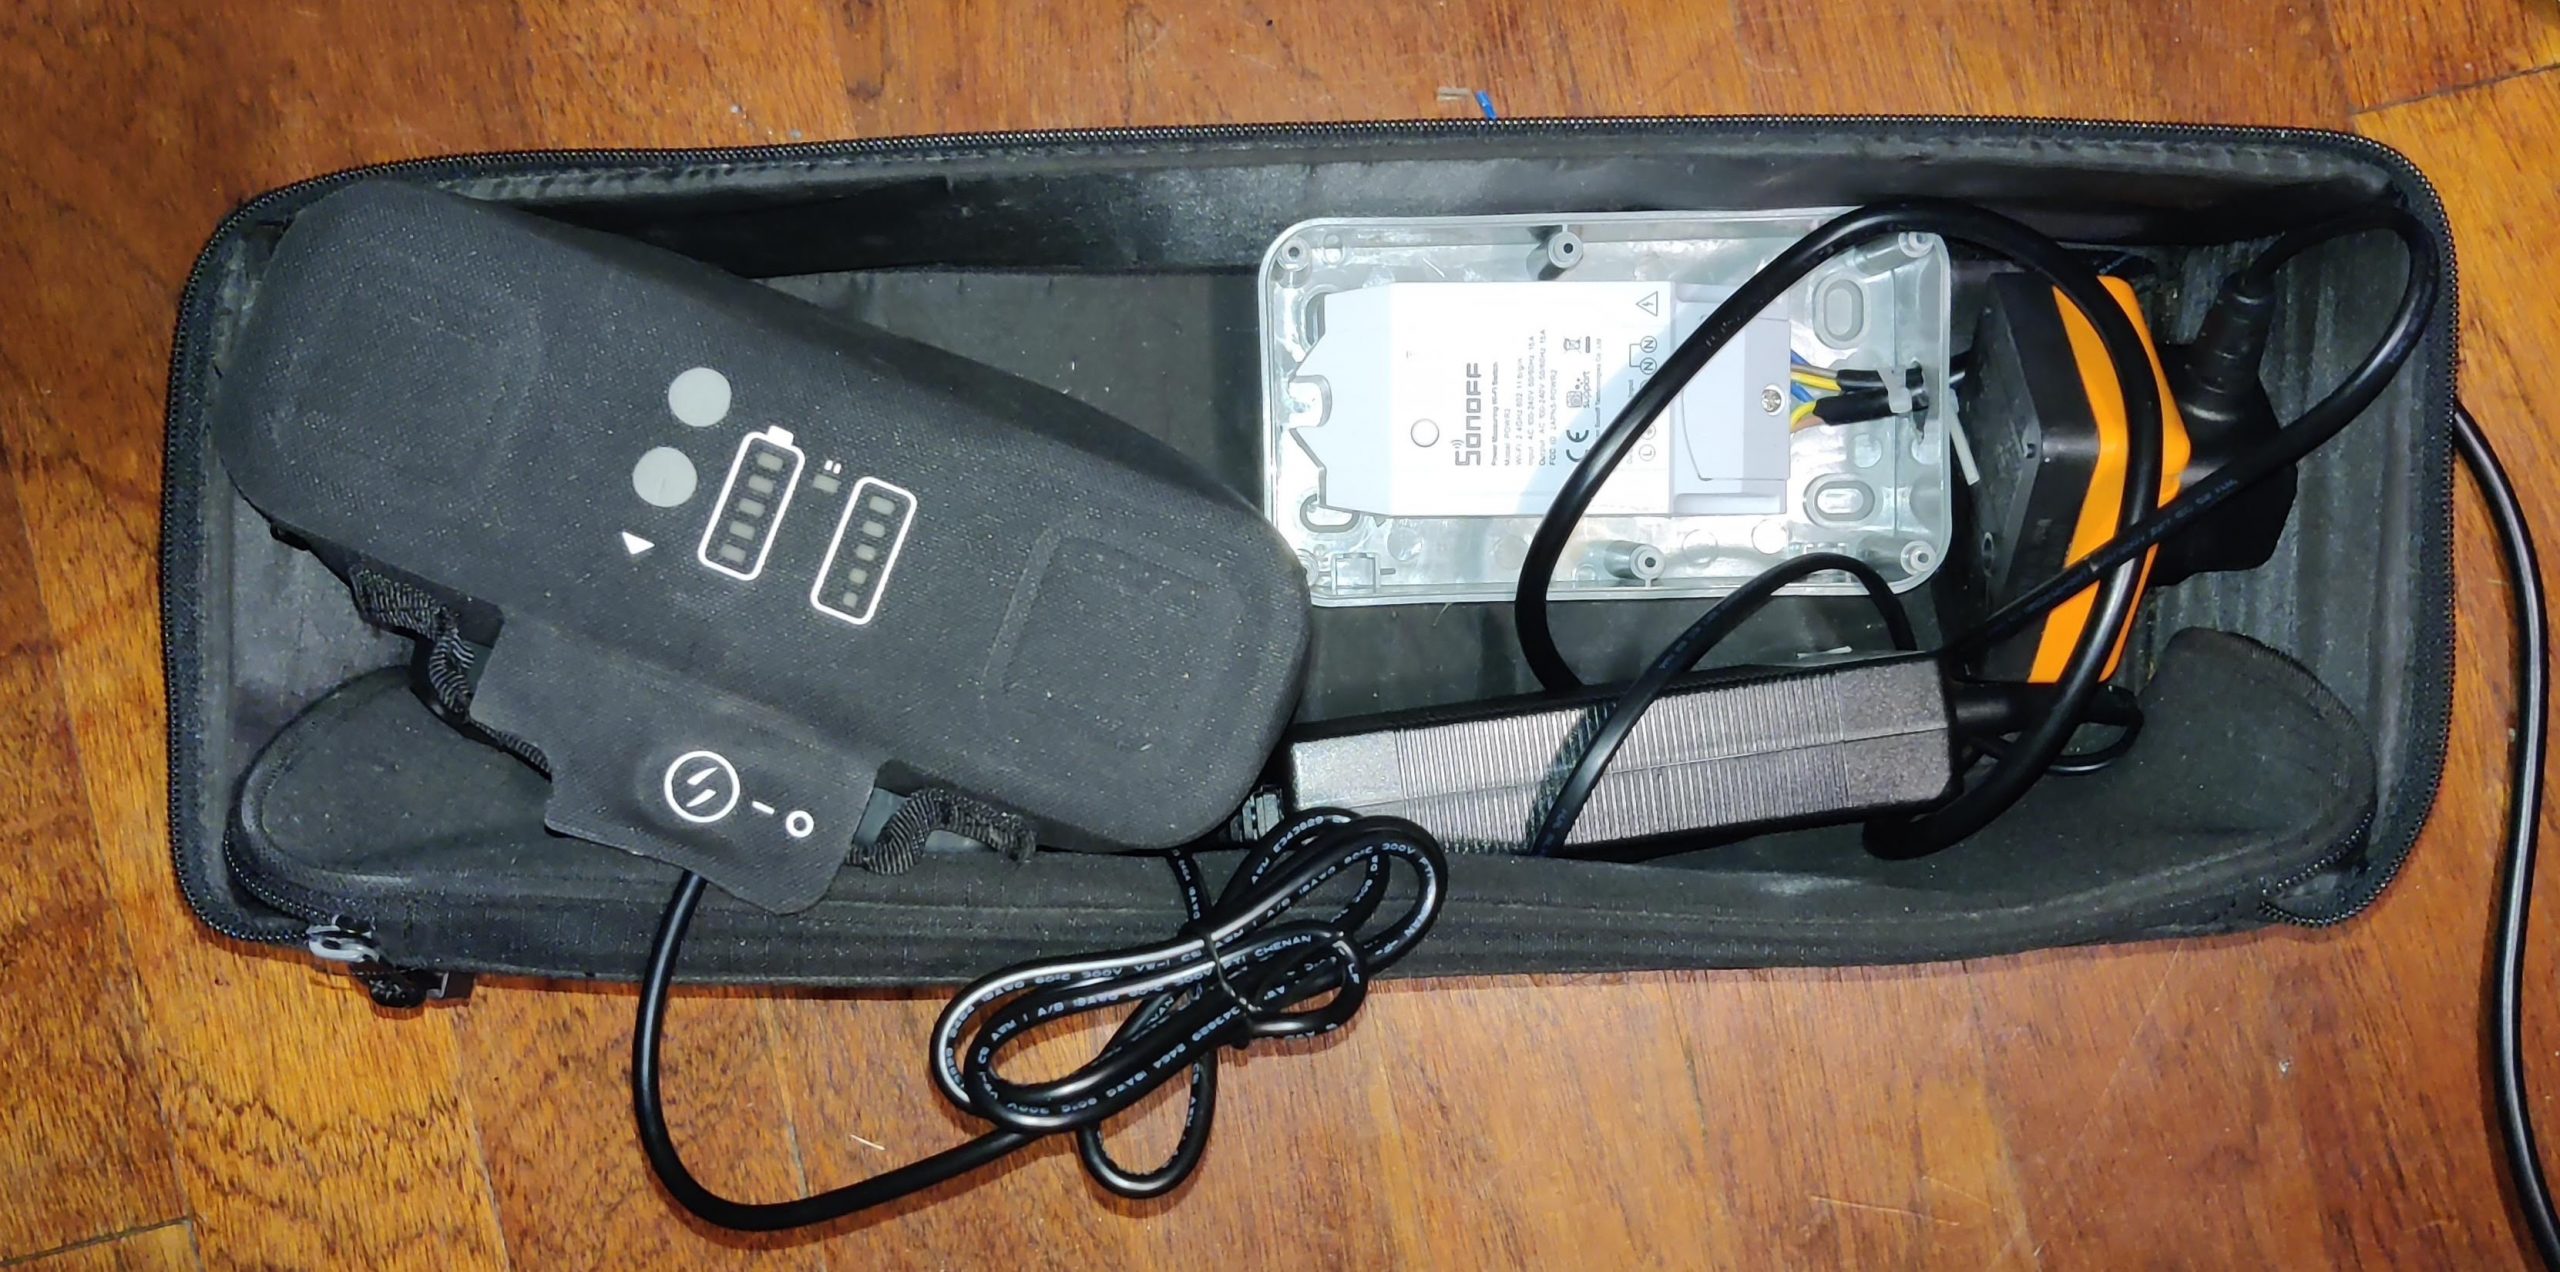
worked example: turn off (and monitor) an e-bike power pack & charger
This method of cutting the charging does more than most people want. It monitors the time and amps to show how much power is going into the battery. This method uses a Sonoff POW2 that I had to hand. Other energy monitoring smart plugs will involve an easier setup.
what you need
- you need an energy monitoring smart socket or switch. My example uses a Sonoff POWR2 smart switch but other brands work more or less easily.
- a spare mains lead as the Sonoff needs wiring to the Swytch power brick which uses the C7 (figure-of-eight) connector.
- Sonoff eWelink phone app for the smart switch
- that’s all the essentials but you could now monitor and control the charge with Home Assistant. It can stop the charging as soon as it’s done. It can also display the charging process to compare the times needed for a battery showing say, 25% or 50% charged. It might also be able to cut the power if an unsafe situation occurred (but do tell me if not).
- Lastly, you need to integrate the Sonoff switch with Home Assistant. I use an add-on for Home Assistant or otherwise ‘flash’ the Sonoff with ESPHome software – both methods described below.
wire-up and adjust the settings in the smart plug app
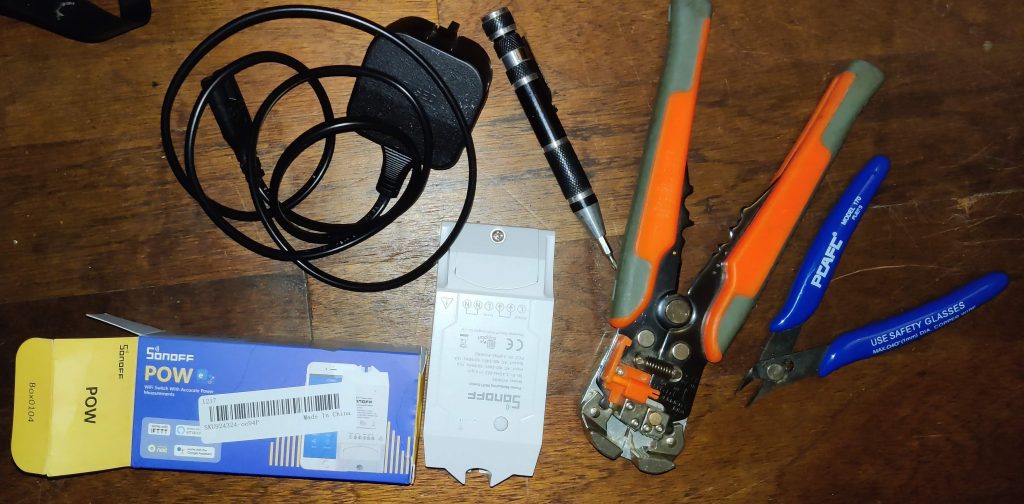
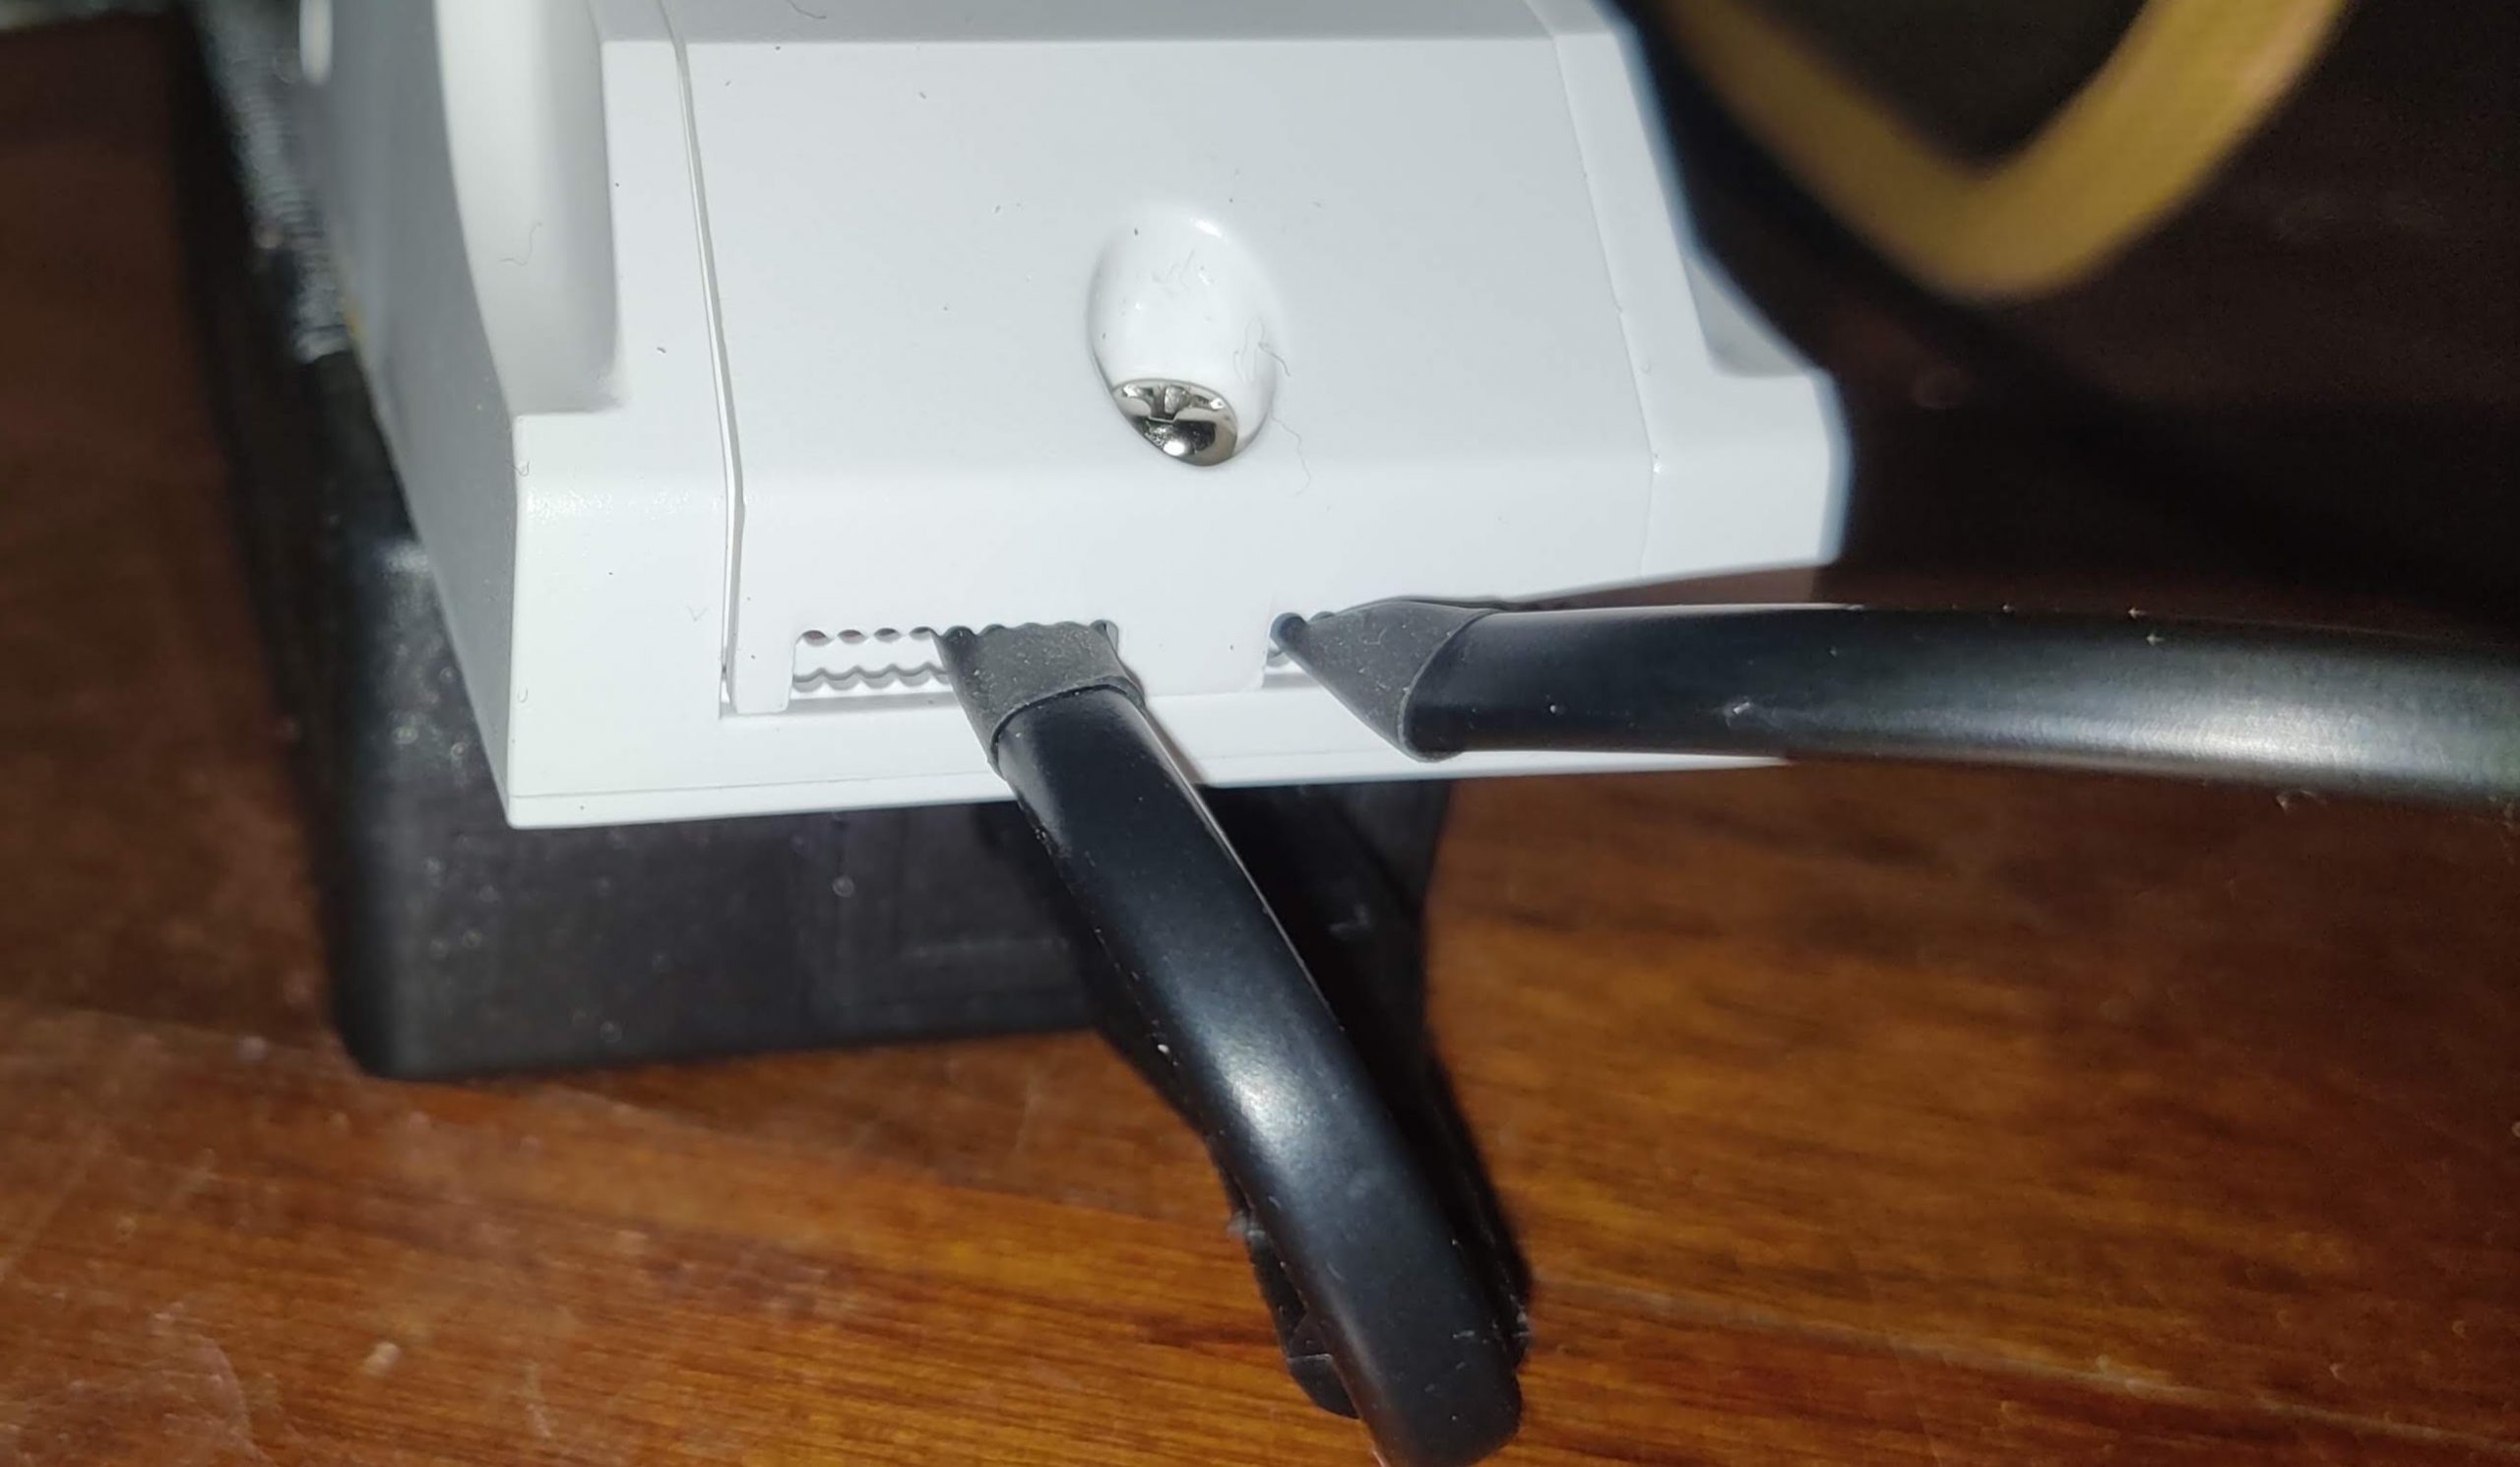

- choose where to cut a spare mains lead – eg cut it furthest from the mains plug to leave a shorter wire on the C7 connector. Wire the cut ends to the Sonoff POW power input and output connectors. If you use your teeth to strip wire insulation you’re not going to do this well. This is mains electricity so I do it well and check the in and out wires are secure.
- alternatively, if you want to use this with other chargers, wire the Sonoff POW to a mains extension socket (photo). In this case cut a trailing socket lead and wire the cut ends to the Sonoff POW input and output connectors. This is more bulky but it’s more versatile.
- install Sonoff eWelink and set up an account to login with.
- click + in the eWelink app to pair a new device. Freshly turn on the Sonoff POW, add your wifi password and give the device a better name. This can work first time or you might need to try using another method. Finally configure the new device in the eWelink app as per these photos.
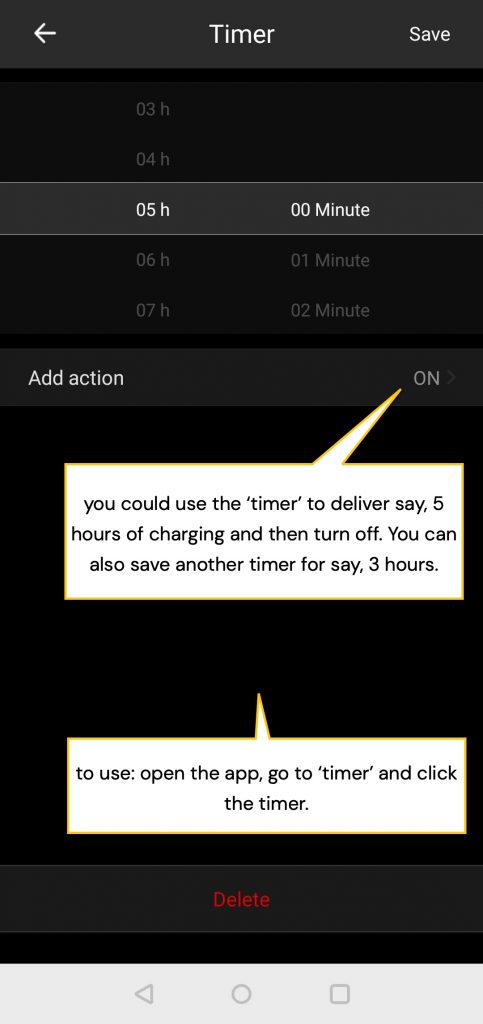
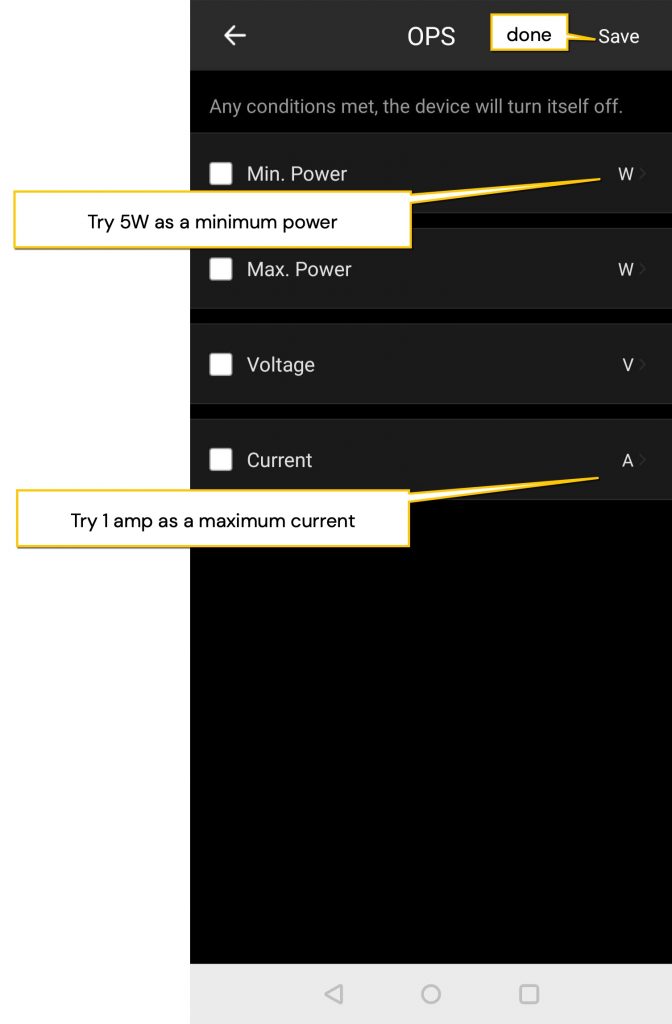
- the eWelink app lets you create a ‘timer’ that when activated in the app gives 5 hours of charging and then cuts the power. An OPS page lets you set parameters for the charger, e.g. disconnect when the charging power drops to 5W or if the power drawn is 150W. (my disclaimer that this is best).
use Home Assistant to control, monitor and record how a Swytch e-bike battery charges
- Continuing on, we’ll now improve on what the eWelink app can do. You’d need a browser on a laptop to interact with Home Assistant installed on a Raspberry Pi. Home Assistant features a lot in my guide to home automation.
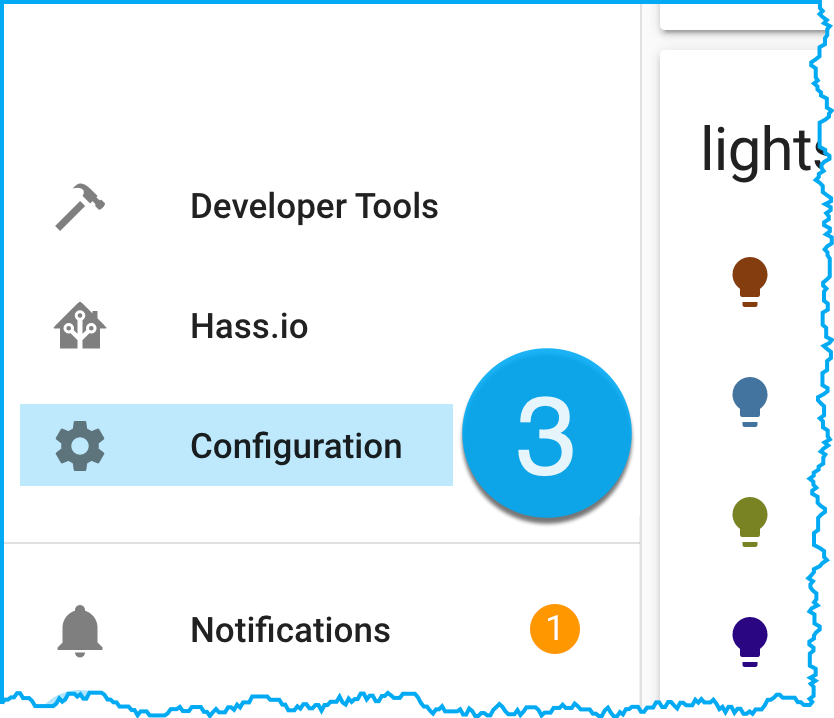
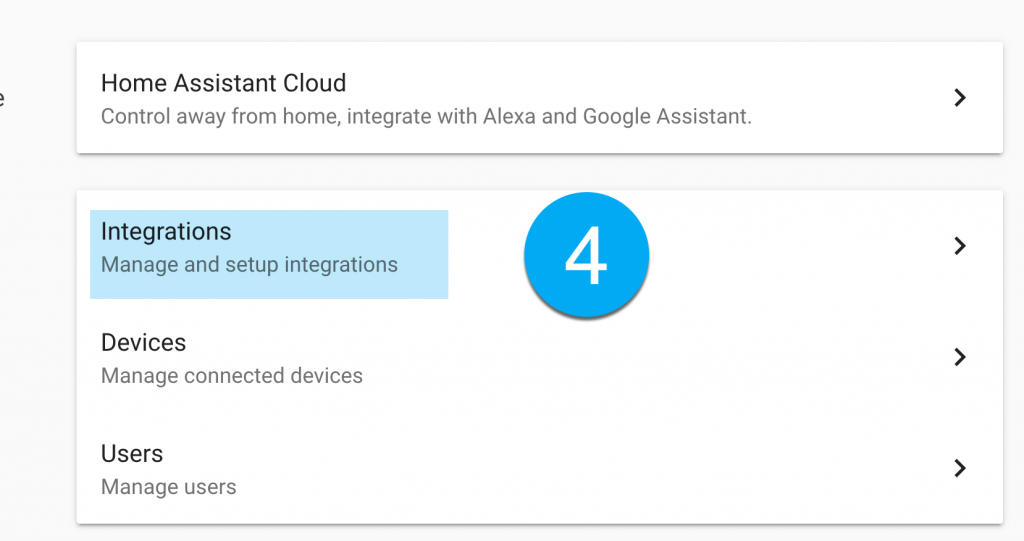
- You need to enable Home Assistant to manage the Sonoff smart switch. As of 2022 you must install the ‘custom add-on for Home Assistant by AlexxIT‘. This involves copying a ‘custom components’ folder at the link into a ‘config’ folder of Home Assistant. Then in the File Editor, open the file configuration.yaml and add your eWelink login details. Logout from the phone app* and then restart Home Assistant under Configuration > Settings > Server Controls.
# SONOFF CUSTOM COMPONENT put this text in configuration.yaml
sonoff:
  username: my.ewelink.login.email
  password: my.ewelink.login.password
  reload: always
  sensors: [temperature, power, current, voltage]

* AWEFULNESS ALERT: the Sonoff component does NOT like multiple logins so you must logout from the app while Home Assistant is in charge. The work round is to go to the EWELINK app and register another ewelink login using a different email of yours (eg put an extra dot in a gmail address joh.n.smith@gmail.com). Login as the main user, find 'manage homes' and 'invite home member' and enter the new email address. Now login as the new email user and you'll see your shared Sonoff device.
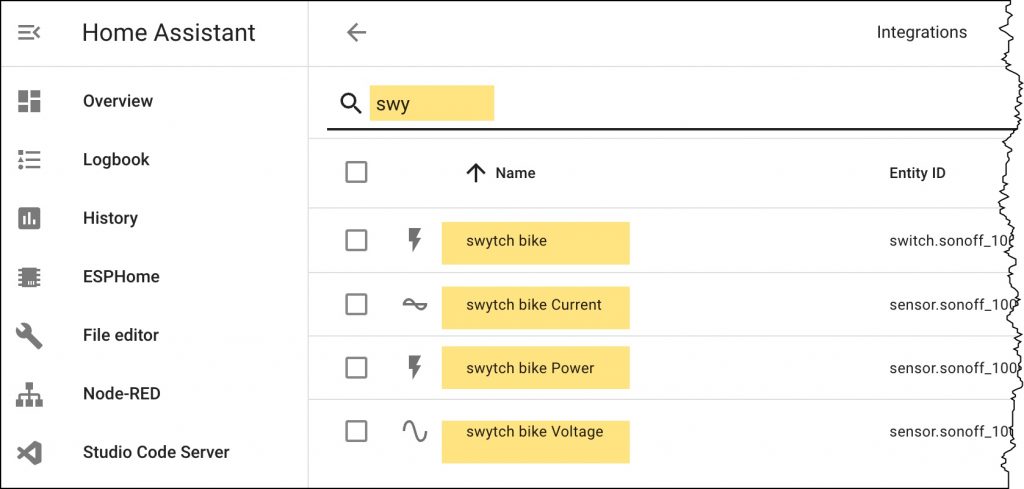
- Go to Configuration > Devices & Entities > Entities and type some letters from the name of the Sonoff POW2. I called mine “swytch bike” hence I can see several entities including the on/off switch and some measurable values – so it’s working. Make a mental note of the entity names.
- Go to the Home Assistant Overview and choose Edit the dashboard (top corner). Add a new card such as a Vertical stack containing a history graph, a sensor card and an entities card – or do something similar to arrive at this. See them displayed on the Home assistant Overview page.

turn off the Swytch charger when the battery is full using a Home Assistant ‘automation’
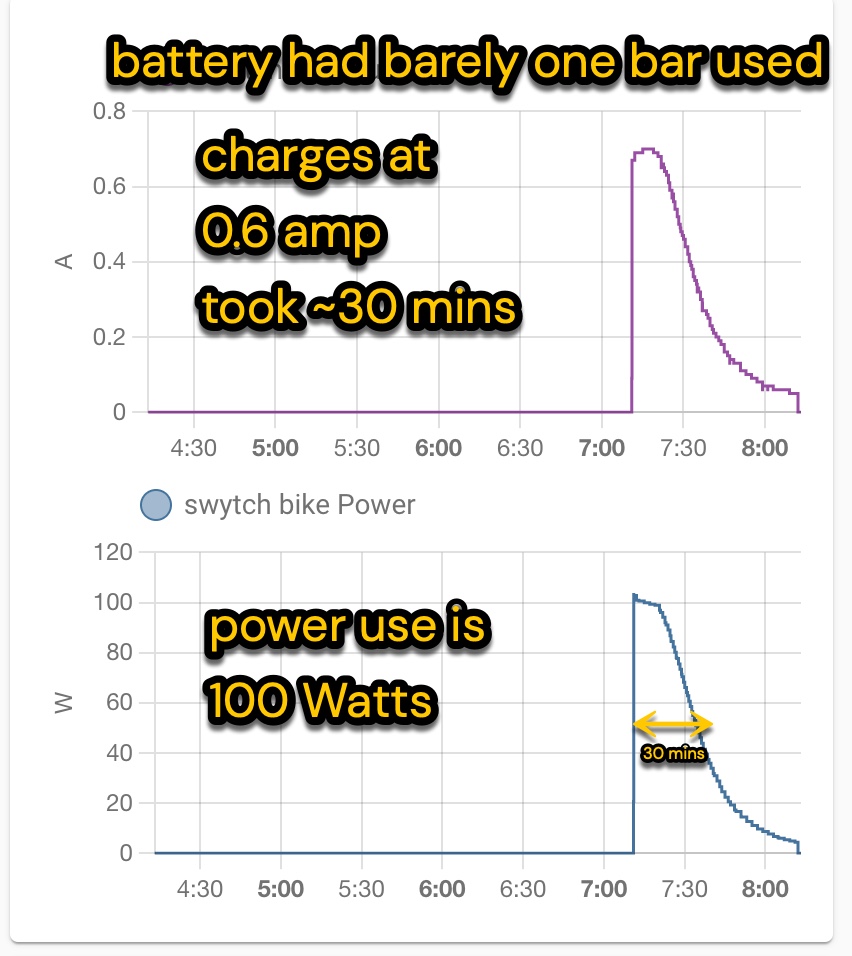
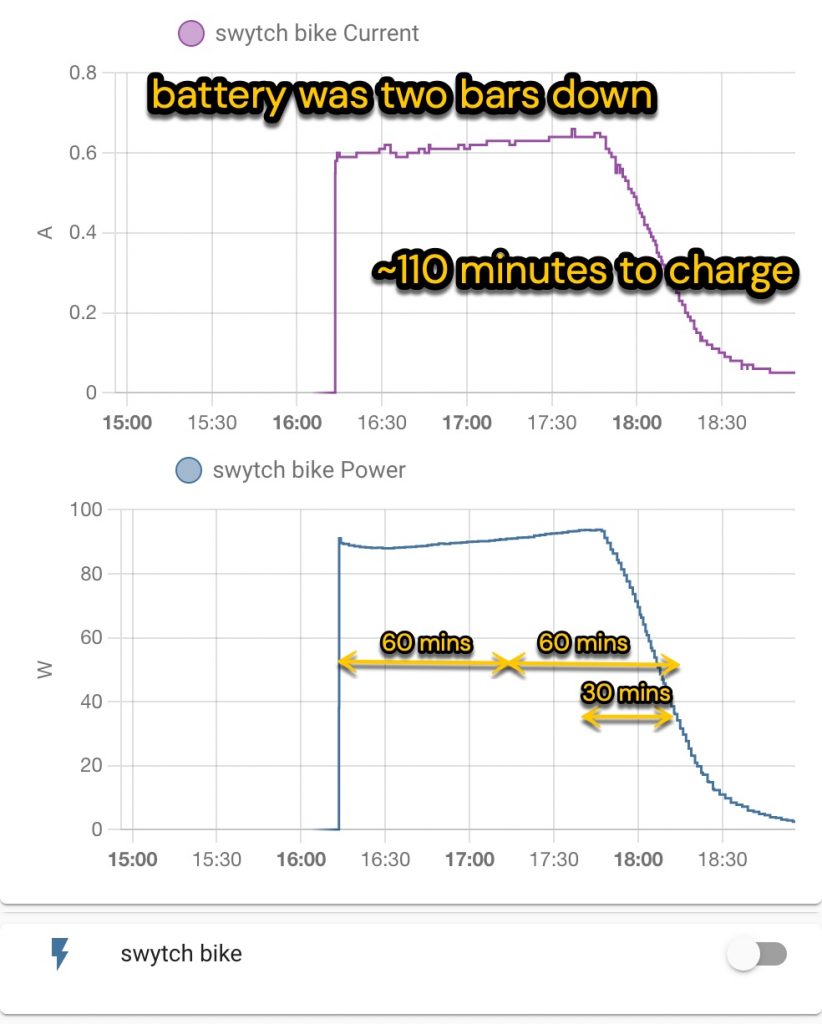
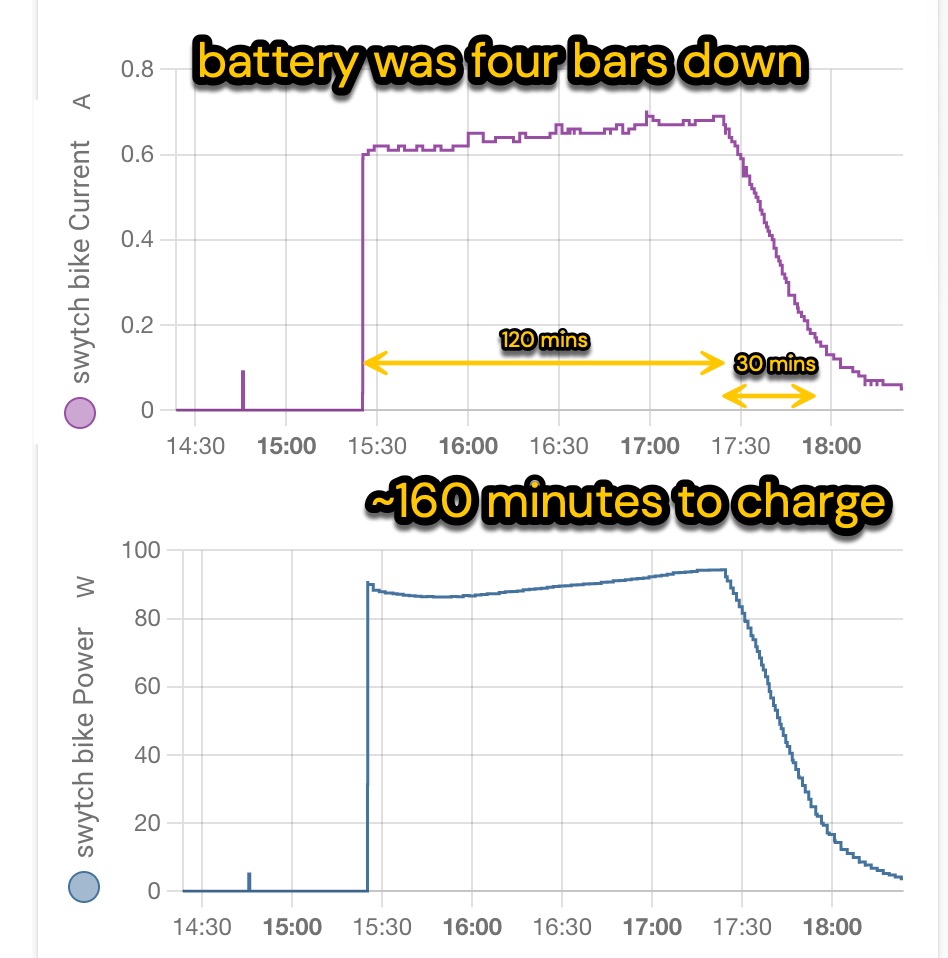
The Swytch charger manual reminds us not to leave the battery forever connected – perhaps for the reasons we’ve been discussing. As you can see from the graphs below, the current supplied to the battery is managed. At some point (around 0.08 amps), the red light on the charger turns green to suggest that you can unplug it. If you don’t unplug it the charge current drops to a low level.
So what we’ll do is make an automation that will constantly keep an eye on the charger to see when the charger is on. If it’s been on for some minutes we’ll then check the current (amps) going to the battery. If that current is below 0.08 amps our battery will be charged so we’ll turn the whole thing off.
In Home Assistant there’s an interface to create an automation as shown below. The things to know are that an automation needs a Trigger (ie the charger is running); and it needs an Action (ie to turn off the power). Our automation also needs a way to delay the turn-off Action until the battery is charged. That’s why we add a Condition which checks if the battery is receiving some current (0.08 amps) current. (Also shown below is the automation as a text file, called yaml code).
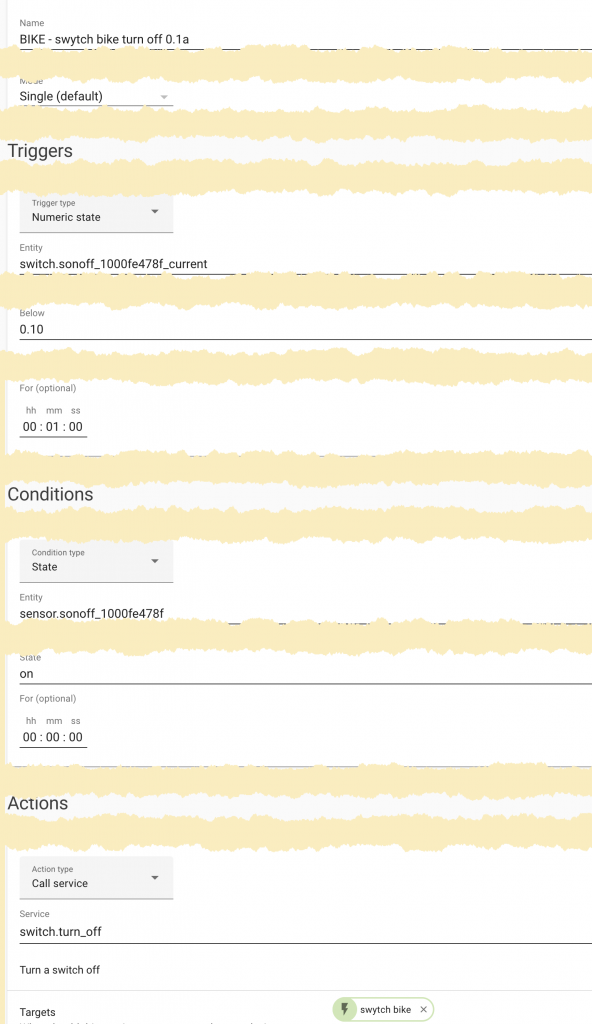
YAML CODE VIEW OF THE AUTOMATION

- id: '1647052046908'
  alias: BIKE - swytch bike turn off 0.1a
  description: ''
  trigger:
  - platform: numeric_state
    entity_id: switch.sonoff_1000fe478f_current
    below: '0.10'
    for:
      hours: 0
      minutes: 1
      seconds: 0
  condition:
  - condition: state
    entity_id: sensor.sonoff_1000fe478f
    for:
      hours: 0
      minutes: 0
      seconds: 0
    state: 'on'
  action:
  - data: {}
    service: switch.turn_off
    target:
      entity_id: switch.sonoff_1000fe478f
  mode: single
monitor the current as the Swytch battery charges
Hereon with Home Assistant in control, all you do when the Swytch battery needs charging is plug it in and press the physical button on the Sonoff unit. You could instead press the swytch bike button in the Home Assistant Overview. Either action starts charging and draws graphs of current over time and power over time. When the battery is full, and not before, our new swytch bike switch turns itself off.
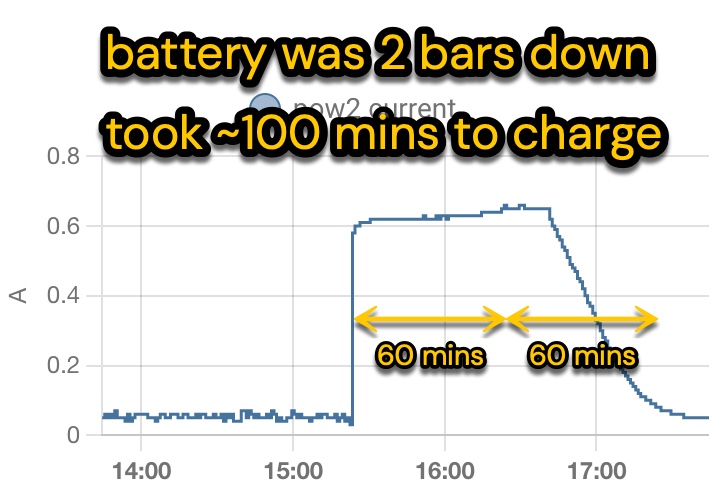
Below I’ve included a little gallery of my experiments. You can see how the different battery levels (or LED bars) correspond to different amounts of battery charging. So far we see that:
- a 36 volt 2 amp charger never charges at more than 0.6 amps
- a Swytch charger and power pack work well to reduce charging current to below 0.05a. We don’t know what happens if the battery charge fades after time.
- the power used is 100 Watts (that’s 0.1 kWh or not much electricity)
- the area under each graph would give us the total current passed or the total power added
- these initial results show you can charge for one hour for one LED bar, two hours for two and three hours for four.
- I have one old and one new PRO battery, maybe there’s a difference still to discover
- also still to discover is how meaningful are the bar levels shown and to compare results with a fast charger
alternative for Sonoff devices: use ESPHome and Home Assistant to control and monitor how a battery charges
Above I’ve shown the least destructive way to integrate a Sonoff POW with Home Assistant so that we can control it (from step 7 above). There is another way which some people like because it offers total control of the device, without the eWelink app.
how to re-program a Sonoff wifi smart relay and control it with Home Assistant
The Sonoff smart plug contains an ESP8266 chip. Its firmware can be replaced with different firmware so that you can use it in Home Assistant. The result is a hike in capability and convenience – but the procedure appears scary:
- go to the Home Assistant add-on store and install the ESPHome add-on
- open the Sonoff POW and solder four male pin headers to VCC, GND, TX and RX. Do not connect this to mains power until you’re away from the computer and the socket has been reassembled!
- use female-to-male Dupont jumper cables to connect the Sonoff to a FTDI UART board set at 3.3v.
- use my code in ESPhome (below) for this plug. Validate and compile the code into a binary file on your PC.
- hold down the Sonoff reset button as you plug the FTDI into a USB socket on your computer. You can now release the reset button.
- use Esphome-flasher to upload the binary file to the Sonoff.
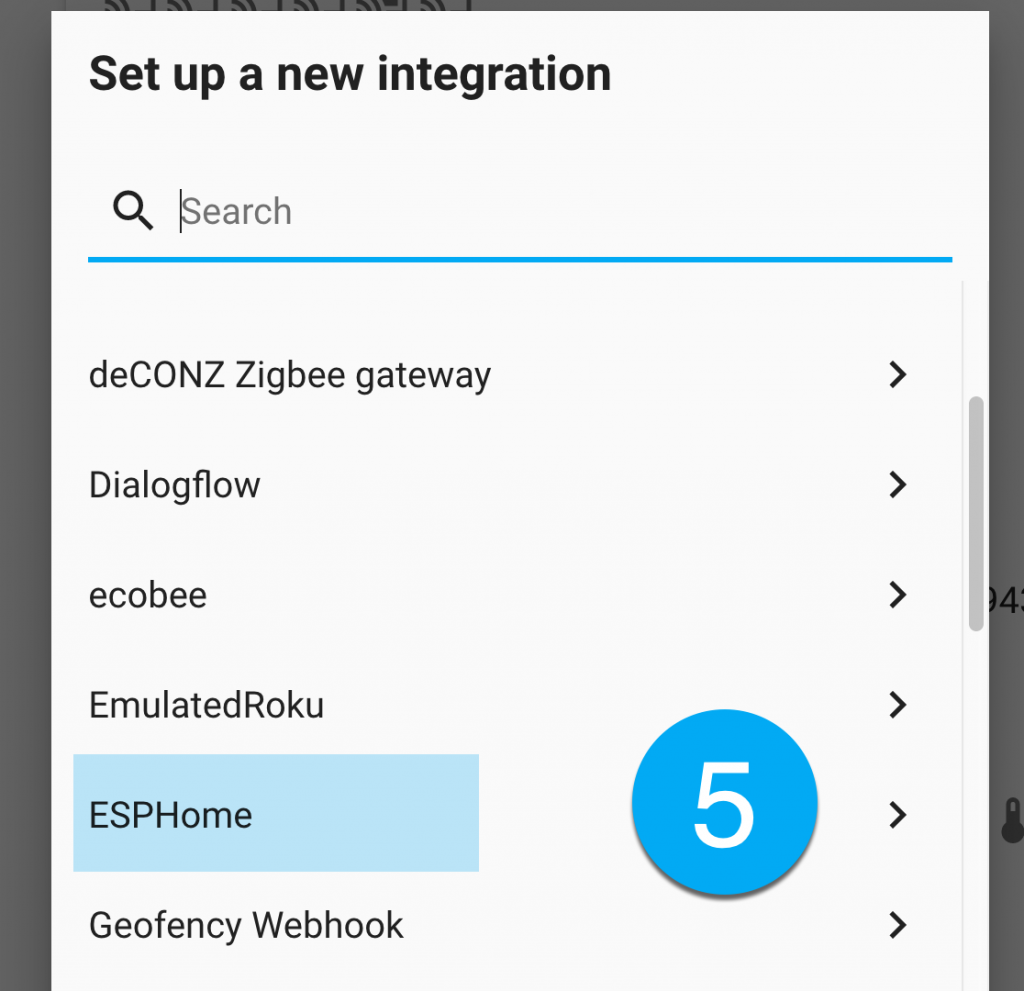
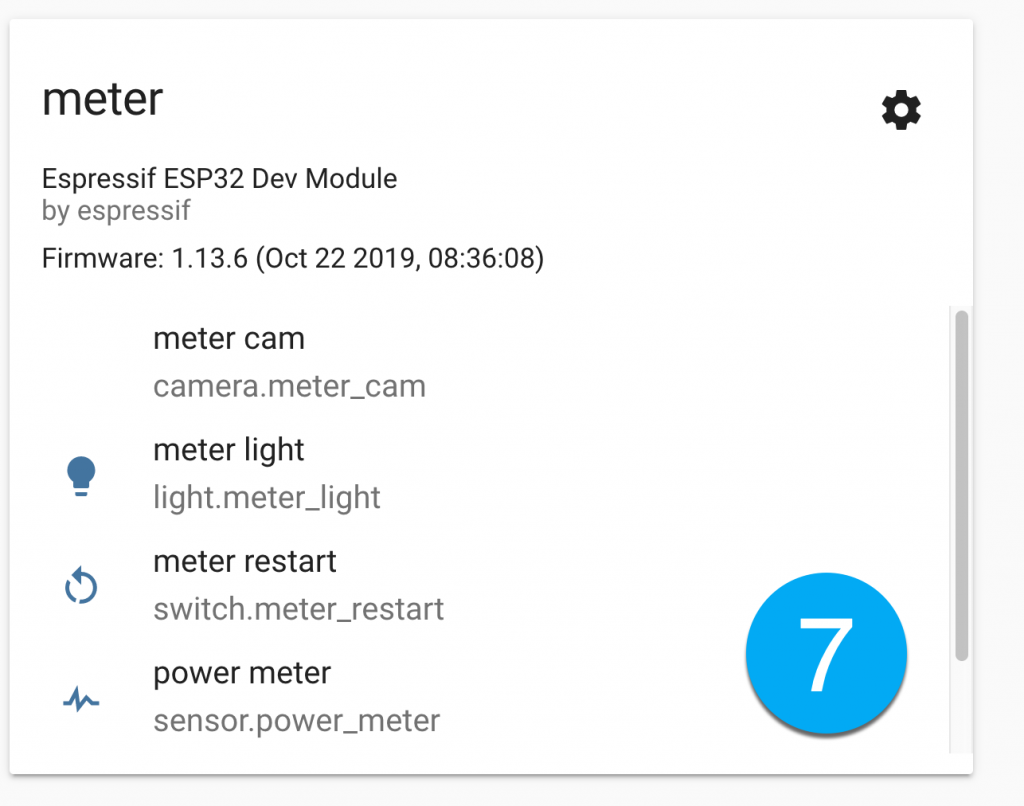
- add the flashed ESPHome device to Home Assistant (picture sequence below)
- add the ‘swytchbike’ entities to the Home Assistant Overview (step 10 above)
this is the code to add to ESPHome
What we’re trying to do is to replace the manufacturer’s code in the Sonoff’s ESP8266 chip with our own more useful code. In the ESPhome code below we add our wifi password and network settings. We can also add a reboot switch or wifi signal meter but below is all we need. This code can be refined further to make the device turn off independently.
 esphome:
   name: swytchbike
   platform: ESP8266
   board: esp01_1m

wifi:
   ssid: "YOUR_SSID"
   password: "YOUR WIFI PASSWORD"
   manual_ip:
     # Set this to the IP you want for the ESP
     static_ip: 192.168.1.11
     # Set this to the IP address of the router. Often ends with .1
     gateway: 192.168.1.1
     # The subnet of the network. 255.255.255.0 works for most home networks.
     subnet: 255.255.255.0

sensor:
  - platform: cse7766
 current:
   name: "swytch current"
 voltage:
   name: "swytch voltage"
 power:
   name: "swytch power"


switch:
  - platform: gpio
    pin: GPIO12
    name: "swytch power relay"
    id: power_relay
    inverted: true
    restore_mode: RESTORE_DEFAULT_OFF

  - platform: gpio
    pin: GPIO13
    name: "blue LED"
    id: blue_led
    inverted: true

binary_sensor:
  - platform: gpio
    pin:
      number: GPIO0
    mode:
      input: true
      pullup: true
      inverted: true
    name: "swytch power button" #button on Sonoff POW
    id: swytch_power_button
    on_press:
      - switch.toggle: power_relay

logger:
  baud_rate: 0
uart:
  rx_pin: RX
  baud_rate: 4800
api:
# OTA ENABLES over the air edits of this from now on
ota:
add the flashed POW2 to Home Assistant
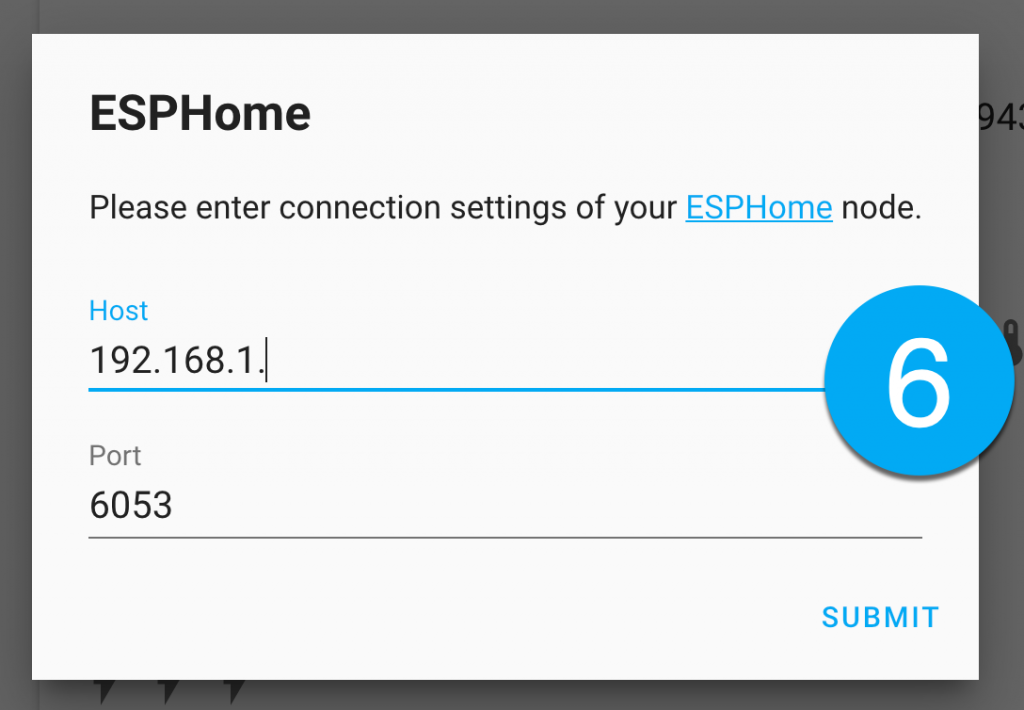
Home Assistant will usually discover an ESPHome device and notify you – taking you to step 7 below. If that doesn’t occur follow this sequence go to: Configuration > Devices & Services > integrations > ESPhome > Enter the IP address > done.
End of adding ESPHome to Home Assistant. Continue as in the section above, “turn off the Swytch charger when the battery is full using a Home Assistant automation“