upgrade your router firmware to ‘FreshTomato’
The Netgear Nighthawk r7000 is a router, switch and powerful Wi-fi access point in one unit and even in 2021, years on from when it was made it still offers your network a boost today. Changing the firmware to Tomato, as explained below, adds versatility to the power. I would only sell the R7000 if a mesh system or Wifi 6 would help me but neither of these are useful to me right now.
why change your free ISP router for a bought one?
Every Internet-connected home has a router that supplies connections to the devices we have. The router supplied with the broadband service is often a modem, a router, a Wi-fi access point and switch in one compact unit. When things go awry, and they do, people like me go find something better.
So I bought a Netgear Nighthawk R7000 which is a router, switch and Wi-fi access point. I gained features and control that the ISP router didn’t offer.
The R7000 is an advanced device but isn’t an all-in-one modem plus router – it has no phone or cable service socket so I still need to connect it to the internet provider’s one-piece ‘router’. (I have yet to find everything in one box).
A downside is that I now need to configure two boxes. I might switch off the ISP router’s wifi; turn off its DHCP setting and then configure my more powerful router to take on these roles. But while there is more to do there’s more that you can do with an R7000. Adding FreshTomato software adds yet more features such as a proper VPN client. I’ve listed those extra below under ‘what can I do now with FreshTomato‘ and after seeing my list you might decide that you don’t want to do this upgrade. For example, I have two R7000 routers, one runs Fresh Tomato perfectly, but some setting on the other caused network havoc at random times and so I reverted back to Netgear’s genie firmware.
get your fancy R7000 router working with your ISP modem
Let’s say you want to gain the benefit of the powerful R7000 WiFi access point or use it as a switch or gain an extra ethernet socket or make use of its software features. For this you use an ethernet cable to connect a R7000 LAN port (not WAN) to a LAN (not WAN) port on your Internet service provider’s modem. In this case neither Internet port on the modem or R7000 router is used. Trust me.
Now with another ethernet cable you connect your laptop to the R7000 router and browse to routerlogin.net and use the Setup wizard. Alternatively connect to the router’s wifi. If you use a phone/tablet, run the Netgear Nighthawk app instead.
However you do that, you want to run the DHCP service or either the R7000 or the ISP modem-router and not both. As the two devices are usually close to each other you might not need two wifi transmitters so you can turn off the WiFi on one of them. My choice would be to use the R7000 wifi.
pause before changing the firmware on the NETGEAR R7000
I am happy to assume that Netgear knows enough about networking to make really good software. If you want to change the built-in Netgear software for something more flexible I recommend that you get your network working. So please pause, fix your network, and get the R7000 working as above, then upgrade the router.
how to change the Netgear router FIRMWARE to FreshTomato or Tomato USB FIRMWARE
As of 2021, FreshTomato is an actively supported alternative firmware for the Netgear R7000. You could instead install Advanced Tomato or Tomato USB following my notes, but as I look now, these have less active updating.
You’ll find many other routers in the list of supported hardware at FreshTomato so do go there hoping to find yours.
You’ll need three firmware images for the Netgear R7000. You must first flash the Netgear R7000 back to a Netgear factory image, then install an initial Tomato firmware image and then finally install the latest version of the FreshTomato firmware. Before and after each of these steps you will login to the router and reset it. During this half-hour process you may lose the connection or need to look up the correct password*. But worry not as the process will work fine if the power is not interrupted. I take no shortcuts so my procedure is a bit longer.
Go to Downloads at FreshTomato and find the arm (not mips) section. In the folder Netgear R-series back to OFW download the original firmware file for the R7000 or your model. This will be the first file to flash, the second firmware is found in Netgear R-series initial files.
The third or final firmware can be identified by the number of your router, a version number and AIO (all-in-one) for example, freshtomato-R7000-ARM_NG-2021.5-AIO-64K. The AIO firmware is larger, has more features than the other firmware which provides just a VPN. So use the AIO as the R7000 has plenty of memory to handle this larger firmware. You’ll need to unzip all the downloaded files.
- connect the router to your laptop (turn off its WiFi) with an ethernet cable. If you’re having trouble connecting to the router, restart the laptop with the wifi off. The laptop’s ethernet connection settings should be bog-standard / default.
- if your R7000 router uses the factory-supplied Netgear firmware, power it up and then use a paperclip in the reset hole for seven seconds to reset the router’s NVRAM. Login to your router (192.168.1.1.) via an Internet browser. Use the default login of user ‘admin’ and ‘password’. One guide suggested to use the admin panel to ‘Reset to factory settings’ – there’s no harm in doing that too. Reboot and reconnect and login as before.
- if you’re already using some custom firmware such as TomatoUSB login with your own credentials and go to Administration > Configuration > Restore Default Configuration > Erase all data in NVRAM. Reboot and reconnect/refresh. Login with the default login (on Tomato the username is “admin” or “root” and the password is “admin”).
- go to the router Administration section and look for Upgrade. Upgrade using the first downloaded Netgear R7000 file named R-series back to OFW. Reboot and reconnect/refresh. Use the default login of user ‘admin’ and ‘password’. If that fails, reset the router using a paperclip in the reset hole for seven seconds, let it reboot and then reconnect/refresh.
- go to the router Administration section and look for Upgrade. Upgrade using the second downloaded Netgear R-series initial file named e.g. freshtomato-R7000-2021.5-initial-64K. Reboot and reconnect. Login with the default username “admin” or “root” and the password “admin”.
- safe extra step if you’re not confident: go to Administration > Configuration > Restore Default Configuration > Erase all data in NVRAM. Reboot and reconnect/refresh.
- go to the Administration section of the FreshTomato panel and look for Upgrade. Use the third and last downloaded Netgear R7000 file named freshtomato-R7000-ARM_NG-2021.5-AIO-64K Reboot and reconnect.
- go to Administration > Configuration > Restore Default Configuration > Erase all data in NVRAM. Reboot and reconnect and login.
- for the sake of completeness I’ll link to two, quite old, videos that visualise this process How to return to Netgear Genie and How to install FreshTomato
Did you know your Gigabit ethernet is shared? If one Gigabit ethernet cable runs to a 4-port switch you get 1/4 Gigabit per socket – so do try to avoid daisy-chaining your switches.
after installing FreshTomato change only these settings:
- set the name of the router – Basic > Identification. Also set the Time menu

- set login name and password – Administration > Admin access.
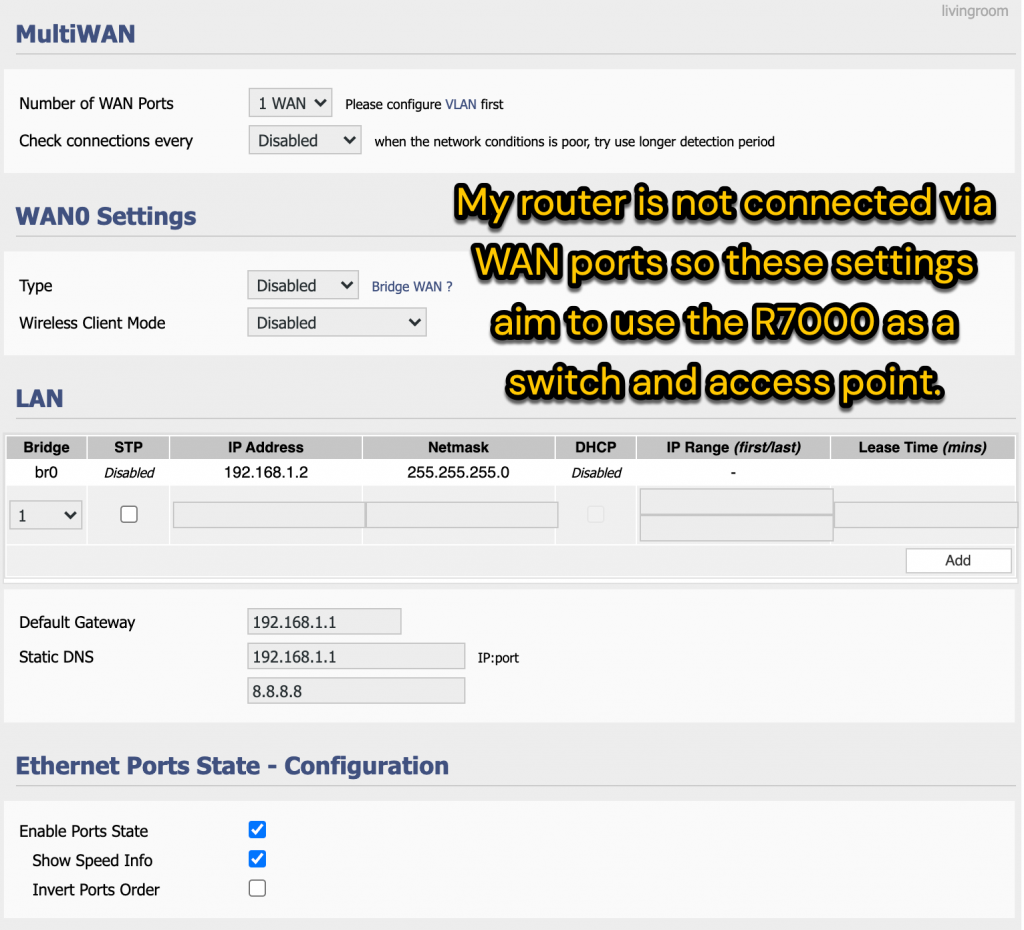
- if you’re using the netgear router as an access point and switch you must disable DHCP and disable WAN port under Basic > Network. And as below, you can set a fixed IP address for the R7000; set the DNS to google’s 8.8.8.8 or your router/gateway (eg 192.168.1.1)
- Set the wireless bands, channels and password. Use WPA2 Personal AES as the security in Basic > Network

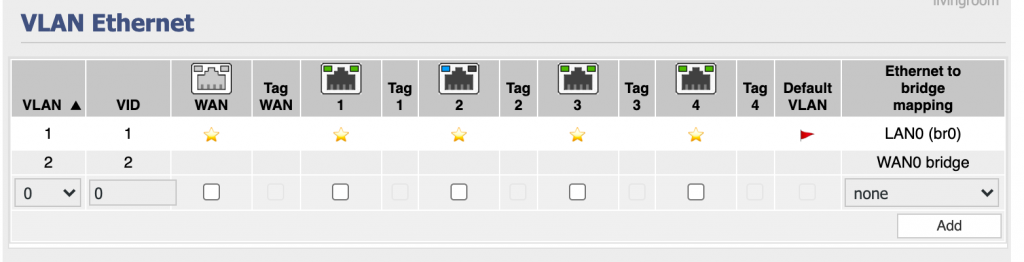
- if like me you’re not using the WAN port (I’m not using the router to manage the WAN) you can recycle the WAN port as an extra Ethernet socket. Go to Advanced > VLAN. First uncheck the WAN socket entry in the WAN0 bridge. Then click OK, save and reboot. When the router comes back up check the WAN box, thus adding this ‘device’ to the LAN0 line. Then click OK, save and reboot again.
- the above two step process work for me and avoid the error: Cannot proceed: one VID must be assigned to WAN. Early versions of Tomato had a simple check box to reuse the WAN socket but this has gone.
The above settings make the R7000 work well.
what can I do now that I’ve installed FreshTomato
For hardcore configuration and features digest the wiki at FreshTomato wiki. The things you can now do include:
- run the nginx webserver and store some webpages on the router
- control access to files stored on a USB stick plugged in to the router
- take over the PPOE login to the Internet normally handled by your modem
- spoof or change the Mac addresses on the R7000 router (if your ISP or cable service is fussy)
- run a VPN so that all your Internet traffic is tunnelled and encrypted and kept private from your ISP. Change your home’s apparent location using the VPN.
- use DDNS to allow you to remotely access your home network even if your IP address changes
- fault find by setting a computer up as a DMZ where it’s totally exposed to the Internet.
- set up UPnP so that devices such as network cameras, speakers and TV are more easily found by apps.
- set up a VLAN – this is a LAN within your network which you want to keep separate or private or limit access to guests in some way.
- set up Virtual wireless channels where you have different SSIDs with different names and passwords even though they use the same radio channels
- set up a captive portal where house or hotel guests connect and read a web page or agree to terms and conditions
- change the network lease time for some users preventing them from using resources at certain times
- block adverts from all traffic coming in
- allocate fixed IP addresses to devices so that they are more easily found on your network
- get logs of Internet bandwidth usage either as a whole or by individual device
- use WOL to wake up shutdown computers
- use various tools – ping and trace for testing connections.
- use a Linux command line with system commands such as SSH
- use wireless survey to test channel and wifi performance
*problems and passwords when logging into the router before or after changing the firmware
The router reboots after the firmware is installed and there follows some vexed moments as you hope you’ll be able to connect again. If entering that router’s initial IP address doesn’t work do wait some moments. If you’re using a wired connection (the wi-fi should be off in this case) either restart the laptop or disconnect/reconnect the ethernet cable for a few moments. In Windows you might open a command line and enter ipconfig to see whether your ethernet adapter is connected or learn the IP address of the router/gateway. I’ve usefully waited up to 5 minutes for a connection to appear.
When the router start page appears you’ll be faced with a login that’s different in the new firmware. The Fresh Tomato login is “admin” or “root” and the password is “admin”. The Netgear genie login is admin / password but when I used the revert to original firmware (OFW) the username was blank and password is ‘admin’. I can make no excuses for whoever created this frustration.
help! my access point changed its IP address to 10.0.0.1
This trick happens when I plug the cable from the router (at say 192.168.1.1) into the Netgear router. The Netgear router corrects its internal IP when there are two gateways at 192,168,1,1. It reacts by setting the internal IP to 10.0.0.1. You can still connect to this IP or else use routerlogin.net to find the device and put this right. (I suspect that the Domain controller on port 53 does this:as my Wanslink devices also go like this)
Hi Roger, I am currently trying to turn my Netgear R7000 Nighthawk router into a Layer 3 switch with (preferably) the wireless function still working. After installing Fresh Tomato, your tutorial here came in very handy.
The ultimate objective for me is to be able to use the Layer 3 interfacing on the R7000 switch (rather than buying an expensive L3 switch) to allow TP-Link Omada Controller PC Software (plugged into one LAN port of the R7000) to control/communicate with a corresponding TP-Link EAP225-Outdoor device (plugged into another LAN port of the R7000).
The primary gateway/modem/router upstream of the R7000 is a Huawei EchoLife HG8245H, branded by the service provider TotalPlay (Mexico).
For what it’s worth I have a Netgear GS308E switch between the Huawei and the R7000, but just as a hub to provide more ethernet ports for the Huawei – I’m not managing the Netgear switch nor does it have Layer 3 capability.
As far as my progress on the effort to turn this R7000 into a L3 switch/wireless router using Fresh Tomato, I was able to follow your and some other online tutorials and:
1. Successfully disabled DHCP, but not sure how to disable NAT, unless that comes along automatically with disabling DHCP?
2. Changed the WAN port to LAN so I could just keep the ethernet connection from Huawei LAN port to Netgear switch LAN ports to R7000 WAN port as is.
3. Set the Default Gateway as the Huawei main IP which is 192.168.100.1, and set the first line of the Static DNS to the R7000 IP which is 192.168.1.1 (for the IP:port entry, whatever that means), and set the second line of the Static DNS to Google’s 8.8.8.8 (per your tutorial, am I right in doing that?) – and this is where I start to get lost and don’t know if I’m doing it right or if I need to do more in Tomato to allow this static route to work on the R7000?
The changes I made above resulted in the R7000 acting, as far as I could tell, as a L2 switch while still being able to connect wirelessly to the 2.4G and 5G networks I had already created. The 2.4G and 5G GUEST networks that I also already had created lost functionality, BUT oddly enough I could NOT get back into the Tomato settings if I was hard-wired or using the normal functioning 2.4G/5G networks, but I WAS able to get back into the Tomato settings for a while if I was connected to one of the 2.4G/5G GUEST networks that had no internet access. It was weird, but eventually that broke and I couldn’t get into the Tomato settings at all anymore. So I reset the router and now I’m back to the original Tomato settings, starting from scratch, round 2!
Lastly, I haven’t yet been able to figure out how to set a static route on the Huawei HG8245H. It seems like a lot of the settings are unmodifiable in the firmware perhaps because it’s a service-provider controlled device? There must be a way to at least get a static route going on it – do I disable DHCP for it like I did on the R7000? One other question of many is if/when I’m able to accomplish this static routing, will it mess up the connections for any of the other devices I have running off the Huawei LAN ports (such as other routers, security cameras, etc)?
Any help/advice that you could offer would be greatly appreciated. I’m pretty novice with this stuff but I work well with step by step tutorials! 🙂
Thank you for your query and contribution Paul. I hope someone out there can help.
You’re a guru I could learn from.
Your points
1) Yes, the R7000/Tomato appears to be doing things that I thought a switch did not do. Hope you find another guru
2) Yes handy to do that. Not all ethernet sockets are physically the same internally.
3) I currently think that it doesn’t matter whether you list the router or google as static DNS. My logic is that 198.168.1.1 guarantees that you have a route out to another DNS. IP/port entry in your case means 192.168.1.1:80 ie not important to specify a port.
Footnote:
I’ve had years of network fails and I appear to have solved them by replacing an R7000 access point/switch with a simple switch. Which is to say, for the moment my setup is simplified with one less ‘router’
Rogers:
By chance, would you have any screenshots taken during the process of flashing your R7000 to FreshTomato?
Thanks
To get some reassurance I did watch a few videos until I was ready to make the change. Do follow my workflow and see eg shibby https://www.youtube.com/@shibbymod
I have yet to create a parallel video channel I hope for! Cheers David for this reminder.