use a TTGO TFT LCD to display temperature graphs and control a water heater
You can graph temperature on this cute display and use buttons to turn on the heater as needed – the project works with Home Assistant and needs very little else
During the summer we use electricity to heat the hot water tank. We could use fossils fuels for heating but the night time electricity rates are competitive just now. One night time heating session can last a day’s use but sometimes the temperature needs a mid-day boost.
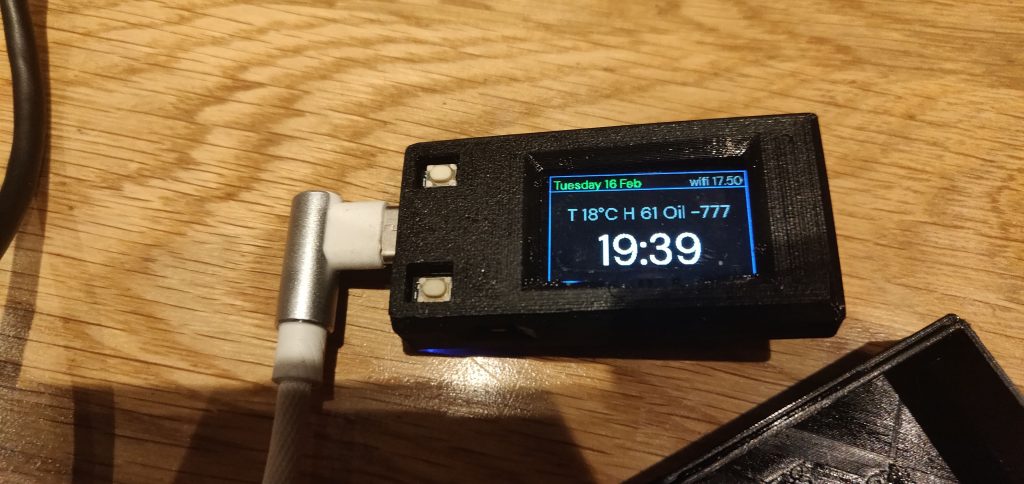
I wanted to give the house occupants a touch panel to boost the water heating as needed. The TTGO st7789v display is small and has two buttons I can program to switch the heating. I added in a graph display to help them decide whether they’ll need more heat. To me it makes no sense to keep the water hot at all times.
The water heater is an immersion heater using 10 amps and 3kW per hour. To make this ‘smart’ and controllable I use the SONOFF Elite relays which can switch 16 amps. The SONOFF TH Elite has a temperature sensor to control the tank temperature – I choose this one. A SONOFF POW Elite is able to record the energy used. These Sonoff (2023) relays make very good upgrades on earlier Sonoff POW2 and Sonoff TH16 devices.
the costs of heating and cooling a hot water cylinder
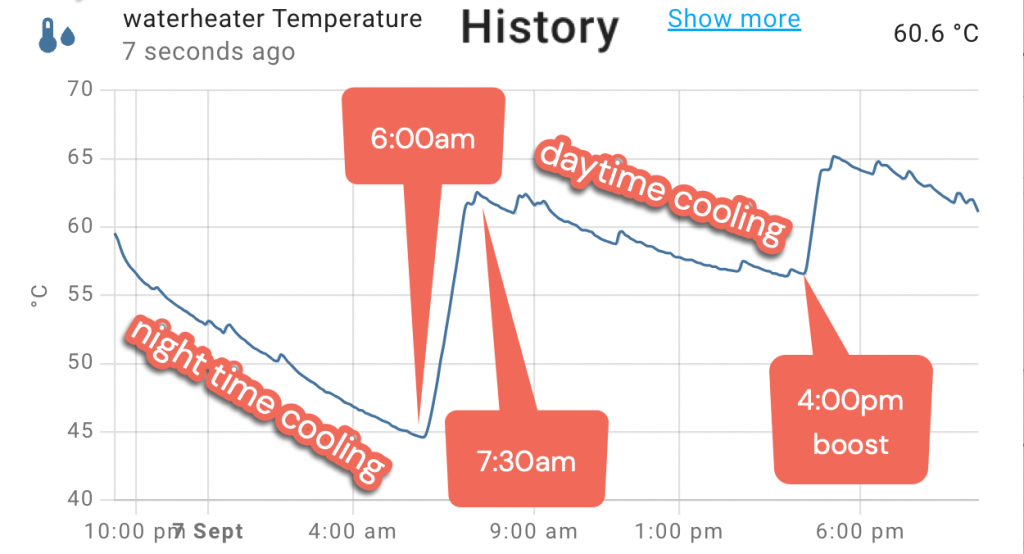
A 3kW heater takes 90 minutes to reheat a water cylinder each day at a cost of £1.60 (peak time electricity) or £0.50 (night time) so it costs either £48 or £16 a month for water heating. The temperature doesn’t always need to be boosted for 60 minutes during the day – but let’s say that if it drops to 45′ C it probably needs a boost. The SONOFF TH Elite allows you to control temperature within the app.
Interestingly, the insulated tank temperature cools faster during the night than it does during the day. In a separate study I found that if you leave the water heater on all the time you’ll use twice the energy compared to a once a day heating session – see here for my work on this.
what you need for this project
- a Home Assistant setup with a sensor to monitor and ESPhome running on eg a Raspberry Pi
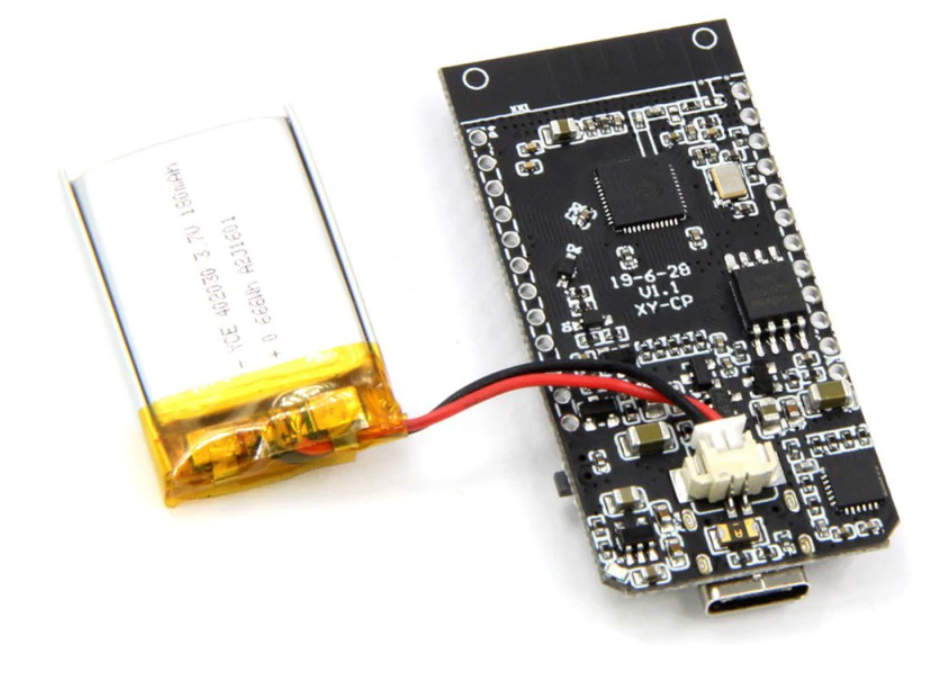
- USB power and a USB-C to USB-A cable
- TTGO T-display or other ESPHome display
features of my TTGO T-display paged display carousel
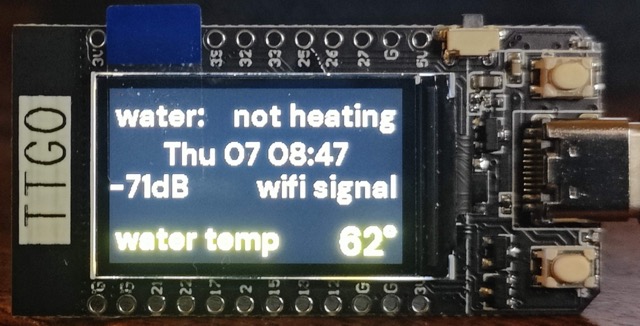
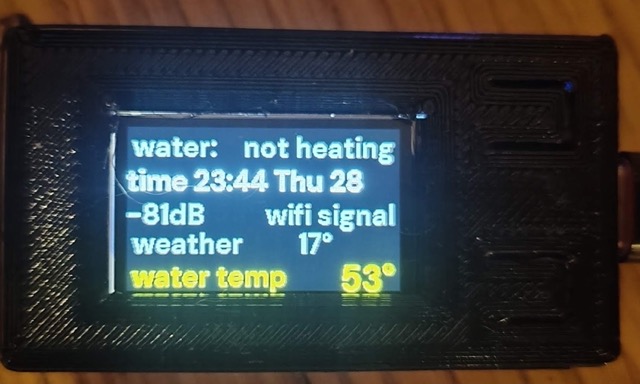
a) a page of text to show the current temperature, wifi signal, online status, whether heating or not.
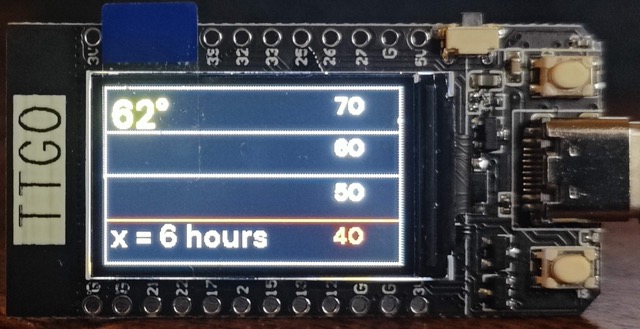
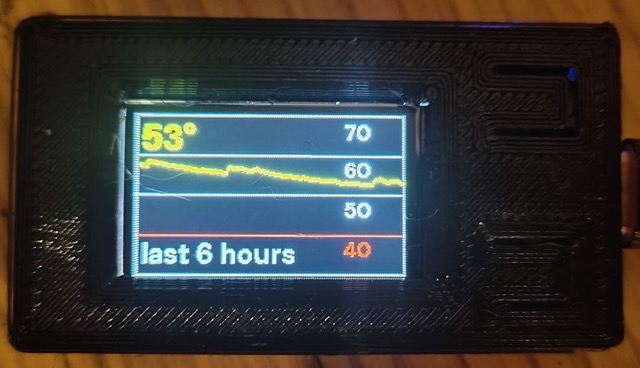
b) A graph filling the screen with 6 hours of data
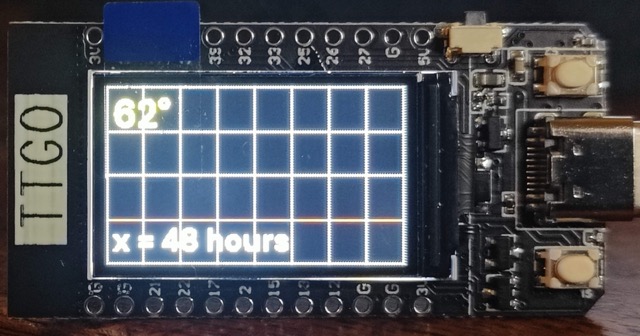
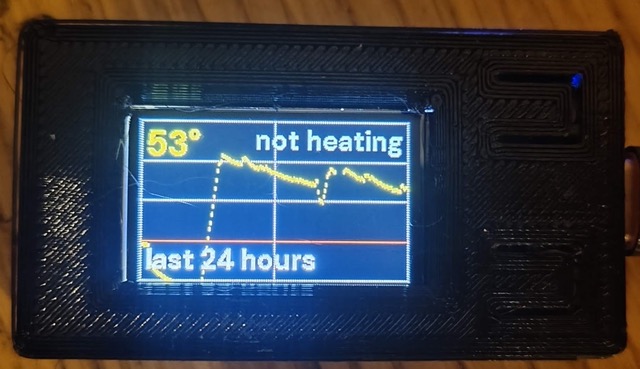
c) A graph filling the screen with 48 hours of data
In a previous project I monitored my oven temperature with a TTGO display in the kitchen. You might instead need to momentarily see the time of the next train, the heating oil tank level, broadband speed or indeed the state of any sensor in Home Assistant.
VERSION 2: A 3D printed case and several improvements on the information display – scroll to the bottom for the version 2 code.
photo: random points worth knowing
go to ESPhome in Home Assistant, add a ‘new device’ and use my configuration
Go to the ESPHome section of Home Assistant and create a new device (+ sign). Follow through the ESPhome web dialogue to prepare the TTGO display and e.g. supply it with your wifi details. Next you Adopt and rename the device to something obvious. Go to the new device, choose ‘EDIT’ and add the code below to the editor panel
- Customize the code below using the Esphome editor to suit.
- Put a font file eg DMSans-Bold.ttf (but rename it Helvetica.ttf) in the ESPHome folder in Home Assistant. Use the File Editor to upload any TTF font but you must either rename it (to Helvetica.ttf) or edit the font name in the code below.
- If ESPhome web fails to connect to your ESP board, hold the boot button as you click Connect.
# VERSION 1 as shown in the video. Version 2 code is at the bottom of this page.

Create a new device in ESPHome. Add these lines to the device code

substitutions:
  devicename: ttgo-immersion

esphome:
  name: "ttgo-immersion"
  friendly_name: ${devicename}
  #name: ${devicename}
  platform: ESP32
  board: featheresp32
logger:
api:
  encryption:
    key: "7Y9QyaTYL4+Ugbe2uj6cJomh1a3Cw6YqRmppt5aMgd4"
# your key will be different
ota:
captive_portal:
wifi:
  ssid: !secret wifi_ssid
  password: !secret wifi_password
  manual_ip:
    # Set this to the IP of the ESP
    static_ip: 192.168.1.62
    # Set this to the IP address of the router. Often ends with .1
    gateway: 192.168.1.1
    subnet: 255.255.255.0
  ap:
    ssid: "ttgo-immersion-display"
    password: "password"
  # fallback hotspot in case wifi fails


# replace my entity IDs with your entity IDs below
sensor:
  - platform: homeassistant
    id: water_temperature
    entity_id: sensor.sonoff_1001da1a47_temperature
    internal: true
  - platform: wifi_signal
    name: "ttgo wifi signal"
    update_interval: 60s
    entity_category: "diagnostic"
    id: wifidb
time:
  - platform: homeassistant
    id: esptime


color:
  - id: color_red
    red: 100%
    green: 0%
    blue: 0%
  - id: color_yellow
    red: 100%
    green: 100%
    blue: 0%
  - id: color_green
    red: 0%
    green: 100%
    blue: 0%
  - id: color_blue
    red: 0%
    green: 0%
    blue: 100%
  - id: color_gray
    red: 50%
    green: 50%
    blue: 50%
  - id: color_white
    red: 100%
    green: 100%
    blue: 100%

font:
  - file: "DMSans-Bold.ttf"
    id: helvetica_L
    size: 76
    # yamllint disable-line rule:line-length
    glyphs: '!"%()+,-_.:°0123456789ABCDEFGHIJKLMNOPQRSTUVWXYZ abcdefghijklmnopqrstuvwxyz/³£='
  - file: "DMSans-Bold.ttf"
    id: helvetica_M
    size: 30
    glyphs: '!"%()+,-_.:°0123456789ABCDEFGHIJKLMNOPQRSTUVWXYZ abcdefghijklmnopqrstuvwxyz/³£='
  - file: "DMSans-Bold.ttf"
    id: helvetica_S
    size: 24
    glyphs: '!"%()+,-_.:°0123456789ABCDEFGHIJKLMNOPQRSTUVWXYZ abcdefghijklmnopqrstuvwxyz/³£='
  - file: "DMSans-Bold.ttf"
    id: helvetica_SS
    size: 18
    glyphs: '!"%()+,-_.:°0123456789ABCDEFGHIJKLMNOPQRSTUVWXYZ abcdefghijklmnopqrstuvwxyz/³£='


graph:
  - id: h6h_graph
    duration: 6h
    min_value: 30
    max_value: 70
    x_grid: 6h
    y_grid: 10
    width: 240
    height: 135
    border: False
    traces:
      - sensor: water_temperature
        color: color_yellow
  - id: h48_graph
    duration: 48h
    min_value: 30
    max_value: 70
    width: 240
    height: 135
    x_grid: 6h
    y_grid: 10
    border: false
    traces:
      - sensor: water_temperature
        color: color_yellow


binary_sensor:
  - platform: homeassistant
    id: immersion_on
    entity_id: switch.sonoff_1001da1a47
    internal: true

  - platform: status
    name: "node status"
    id: system_status
  - platform: gpio
    pin:
      number: GPIO0
      inverted: true
      mode:
        input: true
        pullup: true
    name: "cott-ttgo onbutton"
    id: tdisplay_button_input_0
  - platform: gpio
    pin:
      number: GPIO35
      inverted: true
    name: "cott-ttgo offbutton"
    id: tdisplay_button_input_1

switch:
  - platform: gpio
    pin: GPIO4
    name: "immersion display backlight"
#    id: backlight

  - platform: restart
    name: ${devicename} restart

spi:
  clk_pin: GPIO18
  mosi_pin: GPIO19

# this rotates the display pages at 5 second intervals
interval:
  - interval: 5s
    then:
      - display.page.show_next: my_display
      - component.update: my_display


display:
  - platform: st7789v
    model: TTGO TDisplay 135x240
    cs_pin: GPIO5
    dc_pin: GPIO16
    reset_pin: GPIO23
    rotation: 90
    backlight_pin: GPIO4
    id: my_display
    pages:
      - id: page1
        lambda: |-
          it.graph(0, 0, id(h6h_graph));
          it.printf(5, 1, id(helvetica_M), id(color_yellow), TextAlign::TOP_LEFT, "%.0f°", id(water_temperature).state);
          it.print(5, 98, id(helvetica_S), id(color_gray), TextAlign::LEFT, "x = 6 hours");
          it.line(0, 101, 240, 101, id(color_red));
          it.print(210, 101, id(helvetica_SS), id(color_red), TextAlign::TOP_RIGHT, "40");
          it.print(210, 68, id(helvetica_SS), id(color_white), TextAlign::TOP_RIGHT, "50");
          it.print(210, 34, id(helvetica_SS), id(color_white), TextAlign::TOP_RIGHT, "60");
          it.print(210, 2, id(helvetica_SS), id(color_white), TextAlign::TOP_RIGHT, "70");
      - id: page2
        lambda: |-
          it.graph(0, 0, id(h48_graph));
          it.printf(5, 1, id(helvetica_M), id(color_yellow), TextAlign::TOP_LEFT, "%.0f°", id(water_temperature).state);
          it.print(5, 101, id(helvetica_S), id(color_white), TextAlign::LEFT, "x = 48 hours");
          it.line(0,  101, 240, 101, id(color_red));
      - id: page3
        lambda: |-
          it.strftime((240 / 2), (140 / 3) * 1 + 5, id(helvetica_S), id(color_gray), TextAlign::CENTER, "%a %d %I:%M", id(esptime).now());
          it.print(5, 5, id(helvetica_S), id(color_gray), TextAlign::TOP_LEFT, "water:");
          if (id(immersion_on).state) {
            it.print(235, 5, id(helvetica_S), id(color_yellow), TextAlign::TOP_RIGHT, "HEATING");
          }
          else {
            it.print(235, 5, id(helvetica_S), id(color_gray), TextAlign::TOP_RIGHT, "not heating");
          }
          ;
          it.printf(0, 60, id(helvetica_S), id(color_gray), TextAlign::TOP_LEFT, "%.0fdB", id(wifidb).state);
          if (id(system_status).state) {
            it.print(235, 60, id(helvetica_S), id(color_gray), TextAlign::TOP_RIGHT, "wifi signal");
          }
          else {
            it.print(235, 60, id(helvetica_S), id(color_gray), TextAlign::TOP_RIGHT, "offline");
          }
          ;
          it.print(5, 100, id(helvetica_S), id(color_yellow), TextAlign::LEFT, "water temp");
          it.printf(235, 98, id(helvetica_M), id(color_yellow), TextAlign::TOP_RIGHT, "%.0f°", id(water_temperature).state);

      #  - id: page4 ONLY THREE PAGES ALLOWED
how to configure the ESPhome code
- The above was adapted from various sites, the ESPhome guide to the ST7789V and Koen Vervloesem
- You can change text colour, the font and the font size. You can change the grid range and show a grid.
- There are two buttons on the display and Home Assistant watches them for a press. You can use them to trigger turning on a light or relay in your Home Assistant..
- The sensor section shows that you can pull information about any sensor in Home Assistant. I used temperatures.
- With ‘rotation’ set to O, the display is landscape, 240 pixels long x 140 or 135 pixels high.
- The lamda section does the work of positioning the sensor values and the time. Yes, it’s evil – I suggest you get yourself some graph paper and experiment with the text placement.
go to Home Assistant > Integrations to add your TTGO display device entities
- Go to Home Assistant Configuration. Choose Integrations. If the display hasn’t already been discovered automatically, add ESPhome and enter the IP address you put in the code above.
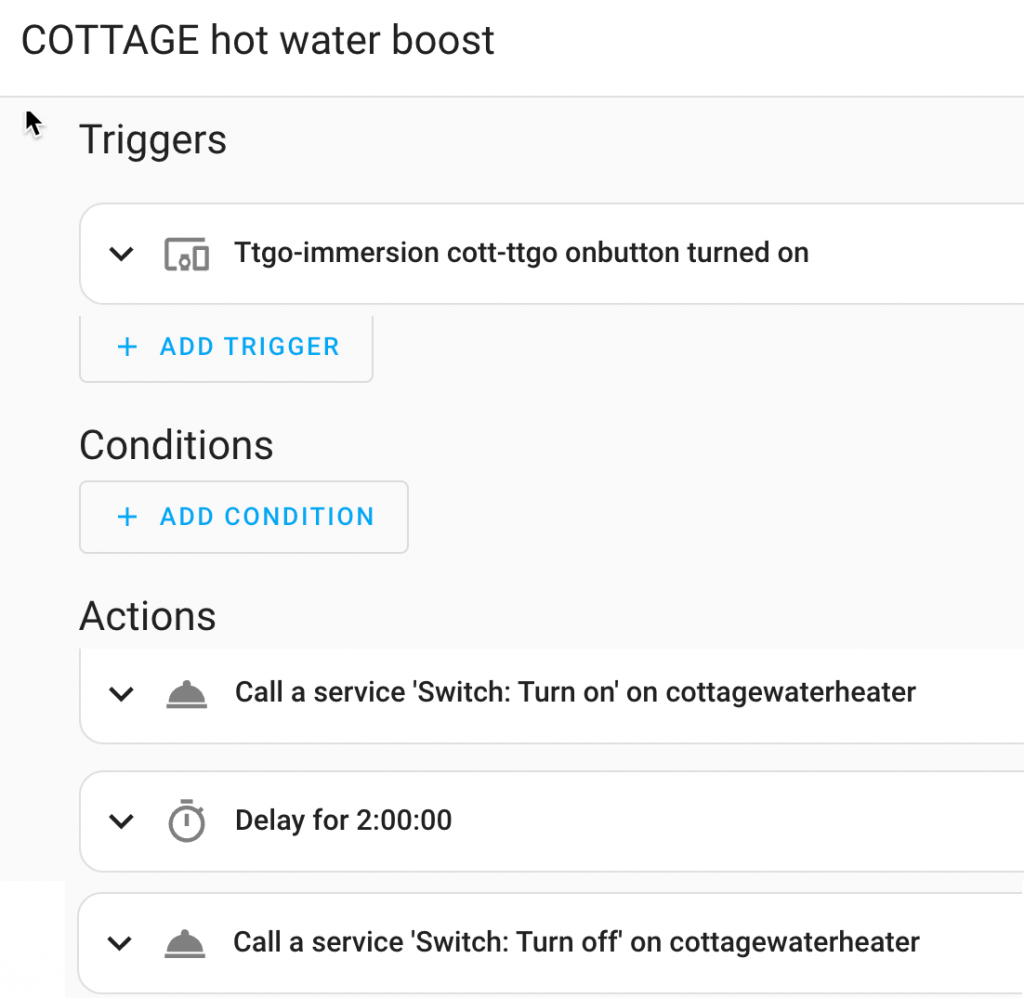
- In Home Assistant create an automation that triggers when TTGO button 1 is pressed for two seconds. The trigger leads to turning on the water heater for about an hour (or untill a good temperature is reached.
- In Home Assistant create an automation that triggers when TTGO button 2 is pressed. This routine turns off the water heater.
create automations a bit like this
Two details to add to the following trigger section – the onbutton must be pressed for a couple seconds. If I also put a wait of a few seconds in the trigger section I’ll prevent too rapid switching.
VERSION 2 PAGES GRAPH DISPLAY - see the set of three photos showing the three pages that rotate every 15 seconds

substitutions:
  devicename: ttgo-immersion
  # graph_width: '210'
  # graph_height: '105'
esphome:
  name: "ttgo-immersion"
  friendly_name: ${devicename}
  #name: ${devicename}
  platform: ESP32
  board: featheresp32
logger:
api:
#  password: !secret ha_password
  encryption:
    key: "="
ota:
captive_portal:
wifi:
  ssid: !secret wifi_ssid
  password: !secret wifi_password
  manual_ip:
    # Set this to the IP of the ESP
    static_ip: 192.168.1.62
    # Set this to the IP address of the router. Often ends with .1
    gateway: 192.168.1.1
    subnet: 255.255.255.0
  ap:
    ssid: "ttgo-immersion-display"
    password: "password"
  # fallback hotspot (captive portal) in case wifi fails

# replace my entity IDs with your entity IDs below
sensor:
  - platform: homeassistant
    id: water_temperature
    entity_id: sensor.sonoff_1001da1a47_temperature
    internal: true
  - platform: homeassistant
    id: watertank_tof
    entity_id: sensor.watertank_tof
    internal: true
  - platform: wifi_signal
    name: "ttgo wifi signal"
    update_interval: 60s
    entity_category: "diagnostic"
    id: wifidb
  - platform: homeassistant
    id: tempweath
    entity_id: sensor.temperature_weath
    internal: true

time:
  - platform: homeassistant
    id: esptime


color:
  - id: color_red
    red: 100%
    green: 0%
    blue: 0%
  - id: color_yellow
    red: 100%
    green: 100%
    blue: 0%
  - id: color_green
    red: 0%
    green: 100%
    blue: 0%
  - id: color_blue
    red: 0%
    green: 0%
    blue: 100%
  - id: color_gray
    red: 50%
    green: 50%
    blue: 50%
  - id: color_white
    red: 100%
    green: 100%
    blue: 100%

# you need a font file named as here or renamed in the esphome folder
font:
  - file: "DMSans-Bold.ttf"
    id: helvetica_L
    size: 76
    # yamllint disable-line rule:line-length
    glyphs: '!"%()+,-_.:°0123456789ABCDEFGHIJKLMNOPQRSTUVWXYZ abcdefghijklmnopqrstuvwxyz/³£='
  - file: "DMSans-Bold.ttf"
    id: helvetica_M
    size: 30
    glyphs: '!"%()+,-_.:°0123456789ABCDEFGHIJKLMNOPQRSTUVWXYZ abcdefghijklmnopqrstuvwxyz/³£='
  - file: "DMSans-Bold.ttf"
    id: helvetica_S
    size: 24
    glyphs: '!"%()+,-_.:°0123456789ABCDEFGHIJKLMNOPQRSTUVWXYZ abcdefghijklmnopqrstuvwxyz/³£='
  - file: "DMSans-Bold.ttf"
    id: helvetica_SS
    size: 18
    glyphs: '!"%()+,-_.:°0123456789ABCDEFGHIJKLMNOPQRSTUVWXYZ abcdefghijklmnopqrstuvwxyz/³£='

# this was going to be the background grid for the graph but I failed to show it
# image:
#   - file: "graphgrid.png"
#     id: graphgrid
#     use_transparency: True
#    resize: 240x135

# in theory you can use substitutions as variables eg if you were using different displays
graph:
  - id: h6_graph
    duration: 6h
    min_value: 30
    max_value: 70
    x_grid: 6h
    y_grid: 10
    width: 240 #${graph_width}
    height: 135 #${graph_height}
    border: False
    traces:
      - sensor: water_temperature
        color: color_yellow
  - id: h24_graph
    duration: 24h
    min_value: 30
    max_value: 70
    width: 240 #${graph_width}
    height: 135 #${graph_height}
    x_grid: 12h
    y_grid: 10
    border: false
    traces:
      - sensor: water_temperature
        color: color_yellow

# remember that a home assistant sensor such as a switch is a binary sensor with states on and off
binary_sensor:
  - platform: homeassistant
    id: immersion_on
    entity_id: switch.sonoff_1001da1a47
    internal: true

  - platform: status
    name: "node status"
    id: system_status
  - platform: gpio
    pin:
      number: GPIO0
      inverted: true
      mode:
        input: true
        pullup: true
    name: "cottgoinp0"
    id: tdisplay_button_input_0
    filters:
      - delayed_on: 500ms
  - platform: gpio
    pin:
      number: GPIO35
      inverted: true
    name: "cottgoinp1"
    id: tdisplay_button_input_1
    filters:
      - delayed_on: 10ms
    on_press:
      - homeassistant.service:
          service: homeassistant.turnoff
          data:
            entity_id: switch.sonoff_1001da1a47

switch:
  - platform: gpio
    pin: GPIO4
    name: "immersiondisplaylight"
#    id: backlight

  - platform: restart
    name: ${devicename} restart


spi:
  clk_pin: GPIO18
  mosi_pin: GPIO19

# paged display switching interval
interval:
  - interval: 10s
    then:
      - display.page.show_next: my_display
      - component.update: my_display


display:
  - platform: st7789v
    model: TTGO TDisplay 135x240
    cs_pin: GPIO5
    dc_pin: GPIO16
    reset_pin: GPIO23
    rotation: 90
    backlight_pin: GPIO4
    id: my_display
    pages:
      - id: page1
        lambda: |-
          it.graph(0, 0, id(h6_graph));
          it.printf(5, 0, id(helvetica_M), id(color_yellow), TextAlign::TOP_LEFT, "%.0f°", id(water_temperature).state);
          it.print(5, 101, id(helvetica_S), id(color_gray), TextAlign::LEFT, "last 6 hours");
          it.line(0, 101, 240, 101, id(color_red));
          it.print(210, 101, id(helvetica_SS), id(color_red), TextAlign::TOP_RIGHT, "40");
          it.print(210, 68, id(helvetica_SS), id(color_white), TextAlign::TOP_RIGHT, "50");
          it.print(210, 34, id(helvetica_SS), id(color_white), TextAlign::TOP_RIGHT, "60");
          it.print(210, 2, id(helvetica_SS), id(color_white), TextAlign::TOP_RIGHT, "70");
      - id: page2
        lambda: |-
          it.graph(0, 0, id(h24_graph));
          it.printf(5, 0, id(helvetica_M), id(color_yellow), TextAlign::TOP_LEFT, "%.0f°", id(water_temperature).state);
          if (id(immersion_on).state) {
            it.print(235, 0, id(helvetica_S), id(color_green), TextAlign::TOP_RIGHT, "HEATING");
          }
          else {
            it.print(235, 0, id(helvetica_S), id(color_gray), TextAlign::TOP_RIGHT, "not heating");
          }
          ;
          it.print(5, 101, id(helvetica_S), id(color_white), TextAlign::LEFT, "last 24 hours");
          it.line(0,  101, 240, 101, id(color_red));
      - id: page3
        lambda: |-
          it.print(5, 0, id(helvetica_S), id(color_gray), TextAlign::TOP_LEFT, "water:");
          if (id(immersion_on).state) {
            it.print(235, 0, id(helvetica_S), id(color_green), TextAlign::TOP_RIGHT, "HEATING");
          }
          else {
            it.print(235, 0, id(helvetica_S), id(color_gray), TextAlign::TOP_RIGHT, "not heating");
          }
          ;
          it.strftime(0, 28, id(helvetica_S), id(color_white), TextAlign::TOP_LEFT, "time %H:%M %a %d", id(esptime).now());
          it.printf(0, 56, id(helvetica_S), id(color_gray), TextAlign::TOP_LEFT, "%.0fdB", id(wifidb).state);
          if (id(system_status).state) {
            it.print(235, 56, id(helvetica_S), id(color_gray), TextAlign::TOP_RIGHT, "wifi signal");
          }
          else {
            it.print(235, 56, id(helvetica_S), id(color_gray), TextAlign::TOP_RIGHT, "offline");
          }
          ;
          it.print(5, 80, id(helvetica_S), id(color_gray), TextAlign::LEFT, "weather");
          it.printf(180, 80, id(helvetica_S), id(color_gray), TextAlign::TOP_RIGHT, "%.0f°", id(tempweath).state);
          it.print(5, 107, id(helvetica_S), id(color_yellow), TextAlign::LEFT, "water temp");
          it.printf(235, 105, id(helvetica_M), id(color_yellow), TextAlign::TOP_RIGHT, "%.0f°", id(water_temperature).state);
Excellent tutorial, and working flawless. Simetimes i lose wifi cionbnection, si i woukld like to show th ip adress of the TTGO. Found out that you should use text sensor for wifi but i can;t get it to work. Any suggestions.
Cheers Erik. Knowing the ip address might be useful. Displaying the wifi signal strength might be useful too.
The text sensor instructions could be more helpful and provide examples. My suggestion is to send the IP address to HA and then use ‘- platform: homeassistant’ to get it back and to display it in the lamdba line with other variables. If that’s not clear shout back.
text_sensor:
– platform: wifi_info
ip_address:
name: ESPIPAddress
AND THEN
sensor:
– platform: homeassistant
id: ipaddress
entity_id: sensor.ESPIPAddress
internal: true
You can get the IPaddress directly within EspHome by giving the WiFi component an ID:
—-
wifi:
id: wifi_wificomponent # Create a label for the WiFi object so we can refer to it.
—-
and then referring to it within the display lambda:
—-
auto addressString = (id(wifi_wificomponent).is_connected()) ? id(wifi_wificomponent).get_ip_address().str().c_str()) : “Connecting…”;
—-
Thank you for this Ned.